Every shop gets a Stallee address, such as saltbush-ceramics.stallee.xyz, shown under Your Stallee Address near the top of the Website Address page; it keeps working whatever else you connect. If you own a domain name, you can use it for your shop too, so customers see your own brand in the address bar. Stallee hosts the shop and keeps the secure connection (https) working. This guide follows Mara Quinn connecting shop.saltbushceramics.example.com to Saltbush Ceramics.
Move an Existing Website to Stallee
You can keep the address customers already know when you move your website to Stallee. You do not need to transfer the domain to a new registrar. Prepare your new shop before you change where the address points.
Prepare Your Shop and Your Domain
- Publish your site and check it at Your Stallee Address. Review your pages, product photos, prices, stock and delivery settings. See Site Design and Stock Levels and Locations.
- If you sell online, confirm that your chosen provider is marked Active at the top of the Payments page. Connecting an account alone does not select it for checkout. See Choose Stripe or Square for Online Payments.
- Save a copy of your current domain settings and ask your old website provider how to reconnect the address if you need to go back. Keep access to old orders, customer messages and payment records.
- Follow Connect Your Domain and Prove You Own the Address below. Add the TXT ownership setting before changing the record that sends visitors to your website. Your old website can stay available while you prove ownership.
Switch the Website Address
- Arrange a time to switch with anyone who manages your domain or old website. If the old website takes orders, plan when it will stop so both shops do not sell the same stock.
- If your old provider still has the address attached to its website or app, ask the old provider or Stallee support to coordinate its release with your DNS change. For example, an existing Cloudflare Workers Custom Domain can conflict with the move. Release a conflicting connection at the agreed switch, before adding the replacement website record. Releasing it early can take the old website offline.
- At the agreed switch, replace only the website record for the exact address you are moving. Use the Name and Points to values shown by Stallee under Step 2 of 2: Point Your Address at Stallee, and add any More Settings to Add.
An address without www or shop, such as saltbushceramics.com.au, can be connected when your DNS provider lets a domain on its own point at another address, as Cloudflare does. If yours cannot, use www and forward the address without it, as described in Forward Your Domain to Your Shop. Do not copy another shop's DNS settings.
Check the Move and Keep a Way Back
- Follow Check That It Works below. Wait until the card shows Live, with the address confirmed and the secure connection working, before choosing Make Main Address.
- Open the address on a computer and a phone. Check navigation, images, products, the cart and checkout readiness. Check your contact form and any other addresses you forward to this one. Your Stallee address remains available if you need another way to reach the shop.
- Keep your old hosting and saved settings until the new shop is working. If you need to go back, restore the previous website record and any old-provider connection with their help. Check orders and stock before reopening the old checkout; changing DNS does not copy new Stallee orders back to the old shop.
If you want to keep links to individual pages on the old website, use Redirects for an Old Website later in this guide.
Connect Your Domain
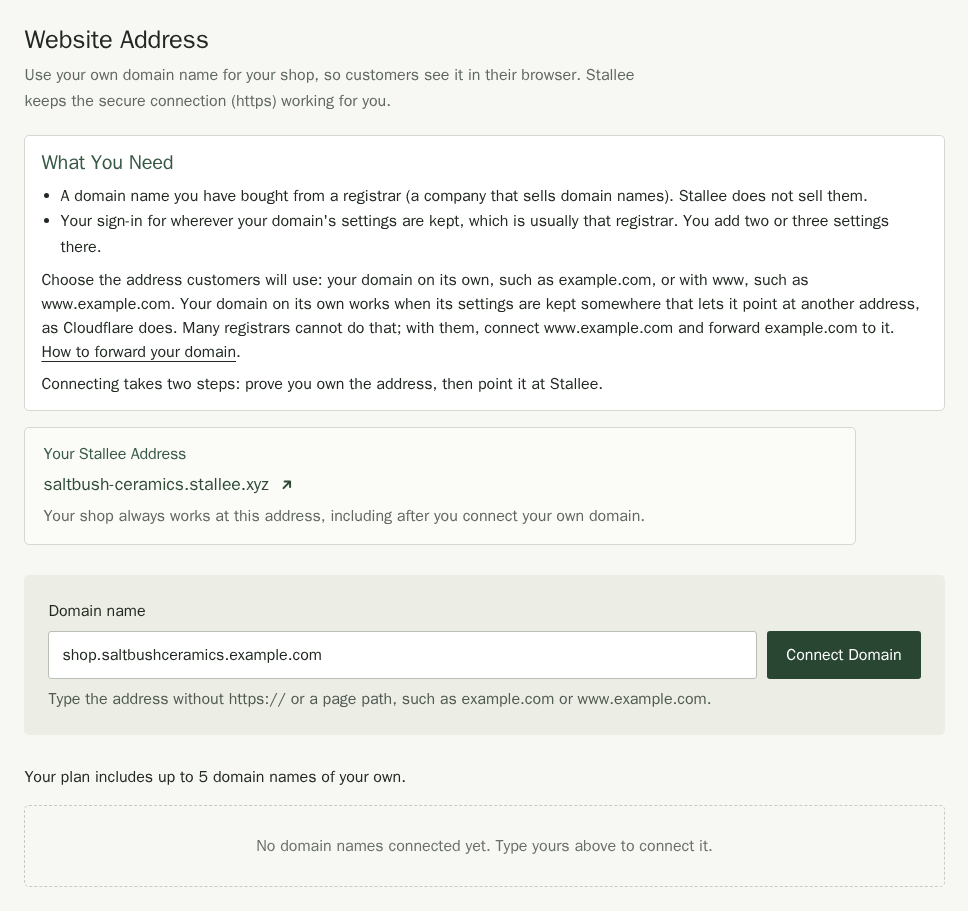
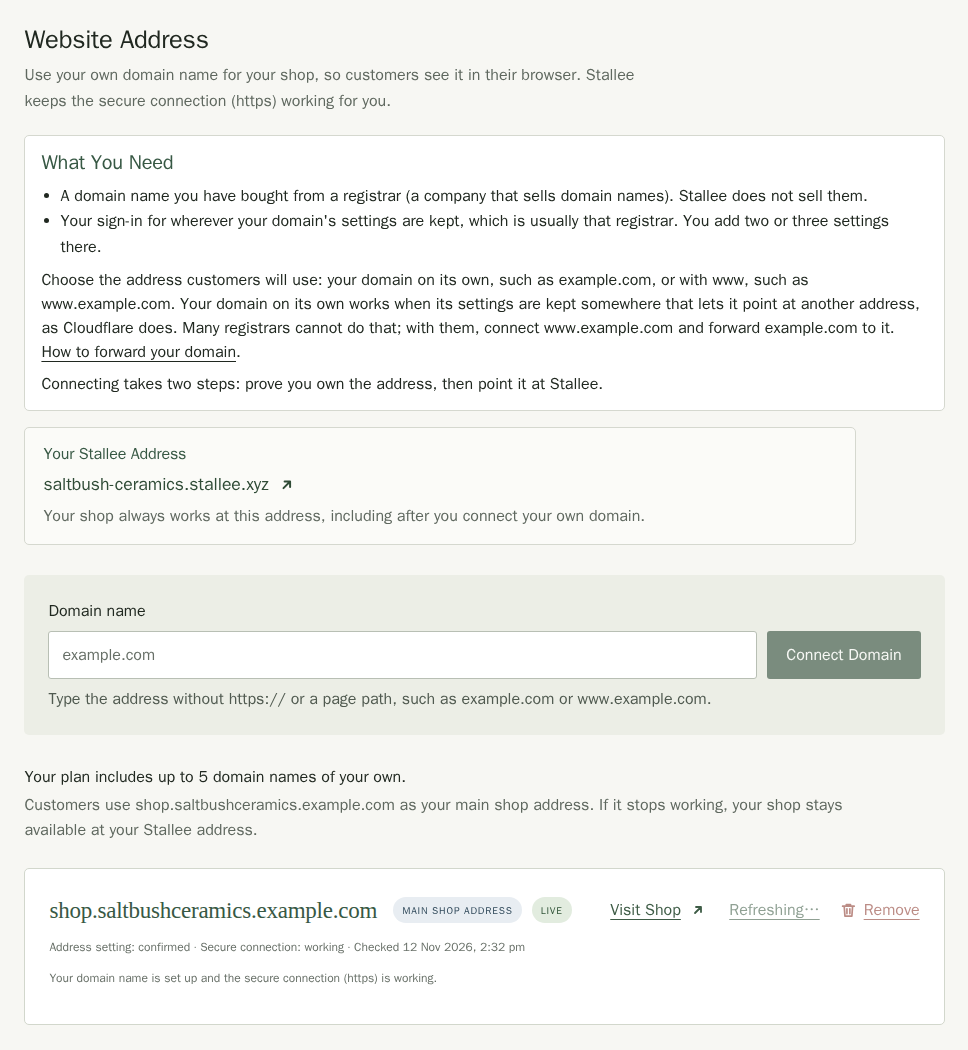
The page starts with What You Need: a domain name you have bought from a registrar (a company that sells domain names), and your sign-in for wherever its settings are kept, which is usually that registrar. Stallee does not sell domain names.
Choose the address customers will use: your domain on its own, such as saltbushceramics.com.au, or with www, such as www.saltbushceramics.com.au. An address that starts with shop works too. Your domain on its own works when your DNS provider lets it point at another address, as Cloudflare does. Many registrars cannot do that; with them, connect the www address and forward the other to it; see Forward Your Domain to Your Shop.
Connecting takes two steps, and each domain card says which one you are on: Step 1 of 2: Prove You Own This Address, then Step 2 of 2: Point Your Address at Stallee.
- Open Website Address in the menu, under Shop website.
- Type your address in Domain name. Leave out
https://and anything after the domain, such as a page path. If you type your domain on its own, Stallee says when that works and offers thewwwaddress in case your provider cannot do it; choose Use www… under the field to switch. - Choose Connect Domain.
Prove You Own the Address
This is Step 1 of 2 on your domain card. Before Stallee can connect the address, add the TXT setting shown on your new domain card at your DNS provider. This proves you control the address. Your DNS provider manages your domain's records; it may be a different company from the registrar where you bought the domain. Your shop stays available at its Stallee address during setup.
Use the copy icon beside Name or Valueon the domain card to copy that exact text. If your browser cannot copy it, select the text and copy it manually. The guide also has copy icons and explains when your DNS provider needs a shorter record name.
- Choose Learn how to add your verification information on the domain card.
- In the guide that opens, choose your DNS provider. Choose Other if your provider is not listed.
- Follow the provider's steps to add a TXT setting. Copy the record name and verification value shown in the guide for this address. Some providers add the DNS zone to the name for you. Use the short name described in the guide in that case, keeping any subdomain such as
shop; do not enter the domain twice. - Save the TXT setting at your DNS provider, then close the guide to return to the domain card.
- Choose Check Ownership. If Stallee cannot find the TXT setting yet, check the values and try again after your DNS provider has updated them.
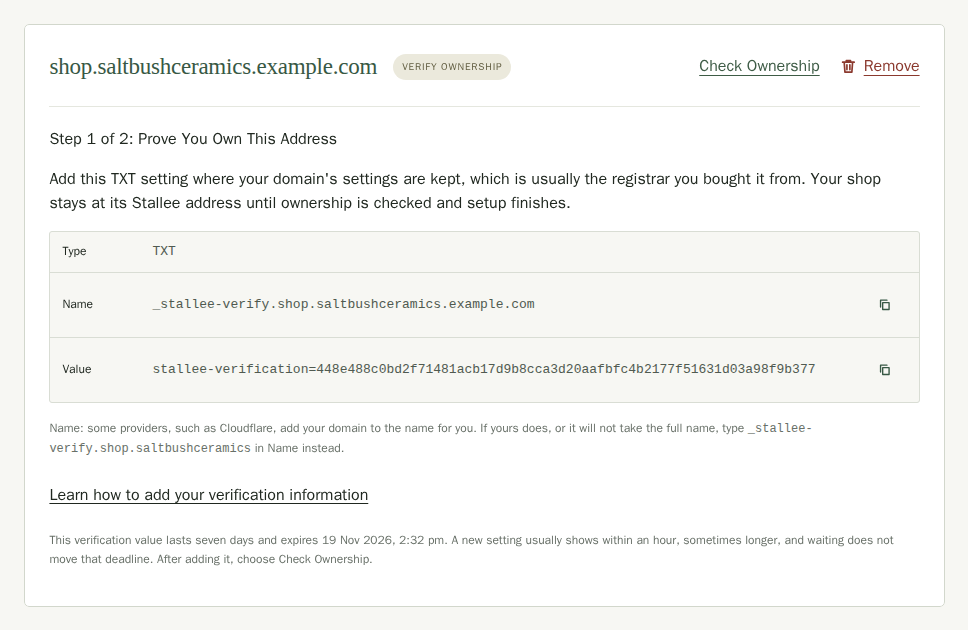
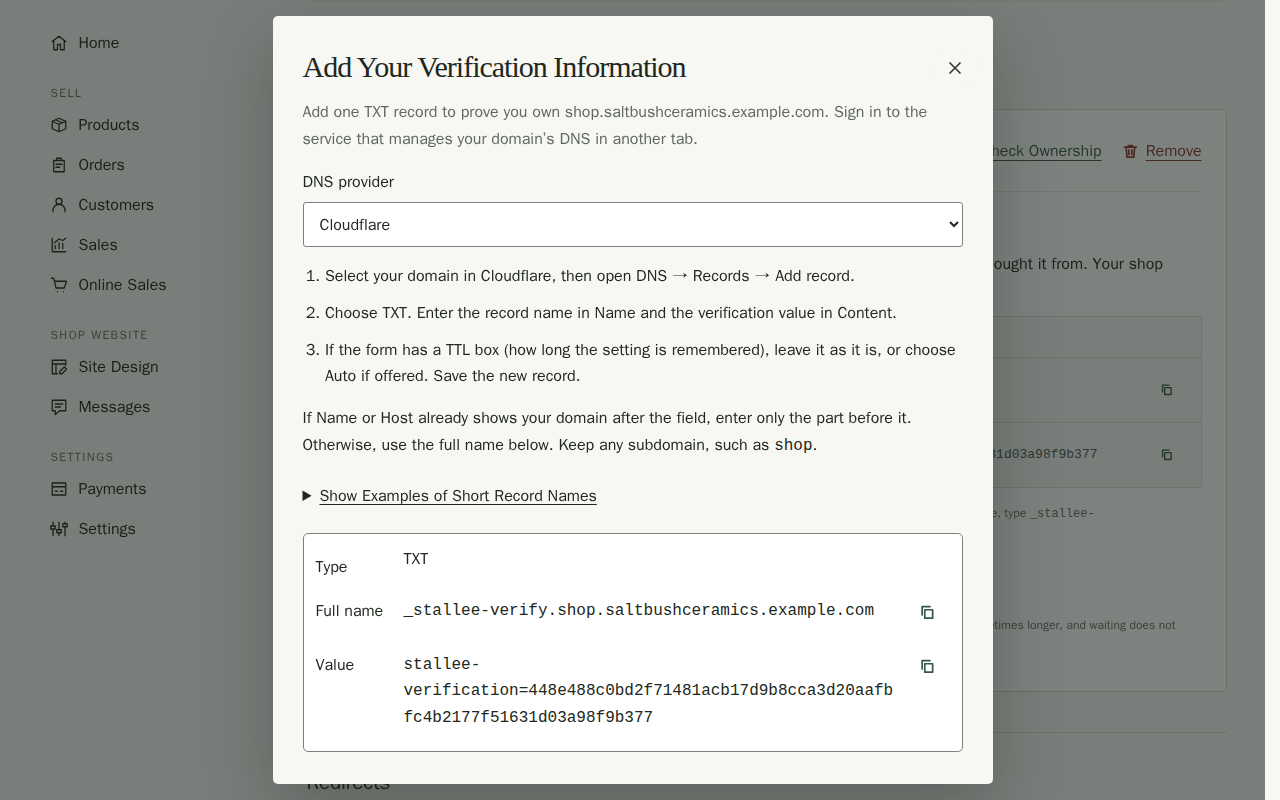
You have seven days from connecting the domain to complete ownership verification. This deadline is separate from the time DNS settings take to become visible: saving a record does not extend the deadline. The expiry shown on the card stays the same when you reopen the guide or check ownership. If it expires before you finish, enter the domain name and choose Connect Domainagain to get a new TXT value and a new seven-day deadline. Replace the old value at your DNS provider. You can choose Remove to cancel a pending check.
Add the CNAME Setting
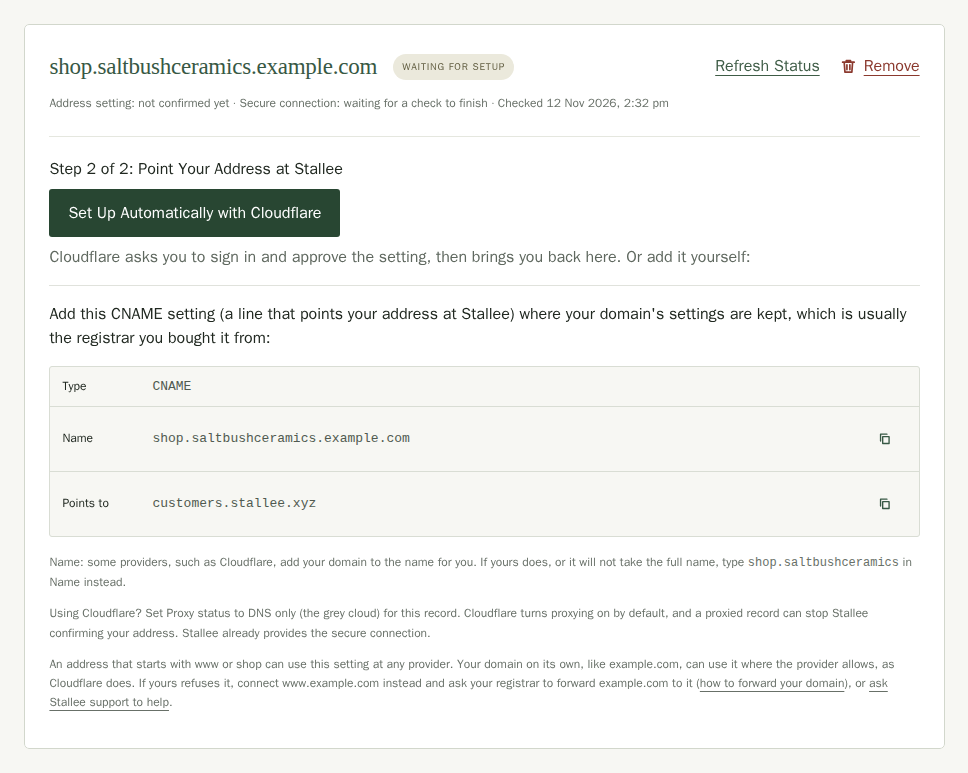
This is Step 2 of 2 on your domain card. Your DNS provider holds the settings that decide where your address goes. You need to add one setting there, called a CNAME, so that the address points to Stallee.
If your domain is set up at Cloudflare, or another company that supports one-click setup, your domain shows Set up automatically with Cloudflare (or that company’s name). Choose it, sign in and approve the setting. You come back to Stallee, which checks the domain for you.
Otherwise, add the setting yourself:
- Under your new domain, find Step 2 of 2: Point Your Address at Stallee. A CNAME is a line at your DNS provider that points your address at Stallee. Note the Type (CNAME), the Name and the Points to value. Use the copy icon beside Name or Points to to copy that exact setting. If your browser cannot copy it, select the text and copy it manually.
- Sign in to your DNS provider (often your registrar) and add a CNAME setting with those exact three values. Keep your email records.
- Some providers, such as Cloudflare, add your domain to the name for you. If yours does, or it will not take the full name, use the short name Stallee shows under the setting:
wwwfor awwwaddress, or@for your domain on its own. The same applies to the TXT setting in step 1. - If your DNS provider is Cloudflare, set Proxy status to DNS only (the grey cloud) for the CNAME. Cloudflare turns proxying on by default, and a proxied record can stop Stallee confirming your address. Stallee already provides the secure connection.
- If you see More Settings to Add, open it and add those settings too.
Forward Your Domain to Your Shop
Customers may type your domain with or without www, so forward the one you did not connect to the one you did. If you connected the www address, ask your registrar to forward your domain on its own to it, as below. If you connected your domain on its own, forward www to it the same way. Many registrars include forwarding with the domain.
- Sign in to the registrar you bought your domain from.
- Find the setting called Forwarding, Domain forwarding, Redirect or URL redirect. It is usually beside the DNS settings.
- Forward your domain on its own, such as
saltbushceramics.com.au, to the fullwwwaddress, such ashttps://www.saltbushceramics.com.au. Choose a permanent forward if you are asked. - Give it time to work, usually within an hour and sometimes longer, then type the address without
wwwinto your browser. It should open your shop.
Some registrars forward ordinary links but not secure ones, so an address typed with https:// and no www can show a security warning. If that happens, if your registrar has no forwarding setting, or if you need the address without www to be your main address, contact Stallee support at support.stallee.xyz. Say which registrar you use.
Check That It Works
New settings can take a few minutes, and sometimes a few hours, to work everywhere.
- Choose Refresh Status after adding your DNS settings. While setup is pending it asks for the secure connection to be checked again and shows the latest address and secure connection status. Once the address is live it only reads the current status, so it never disturbs a working connection. You can refresh as often as you like.
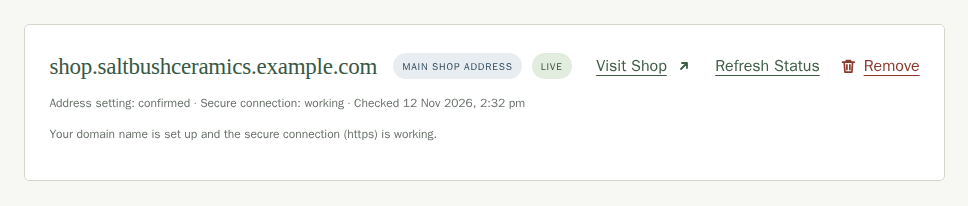
- The label changes from Waiting for setup to Live once the address points to Stallee and the secure connection (https) is ready. The line beneath the name shows the Address setting and the Secure connection, and when we last checked.
- If you see Needs Attention, check your settings against the card. If they match, or setup remains pending, contact Stallee support to check the address and secure connection.
- Choose Visit Shop to open your shop at the new address. If the address stops working or setup remains pending, contact Stallee support.
Choose Your Main Shop Address
Customers use the card marked Main shop address as your shop's address. If it ever stops working, your shop stays available at your Stallee address. If you connect more than one domain, choose Make Main Address on the one you prefer. A domain that is not live yet is marked Main address once live until its setting and secure connection are ready.
With one live domain there is nothing to choose: it is your main shop address, and its card shows no main-address link. Once a second domain is live, the card marked Main shop address offers Keep as Main Address. Choose it to confirm that domain, so the other one does not take its place.
Remove a Domain
- Choose Remove on the domain's card.
- In the box that opens, which asks whether to disconnect your domain, choose Remove Domain. Choose Keep Domain to cancel.
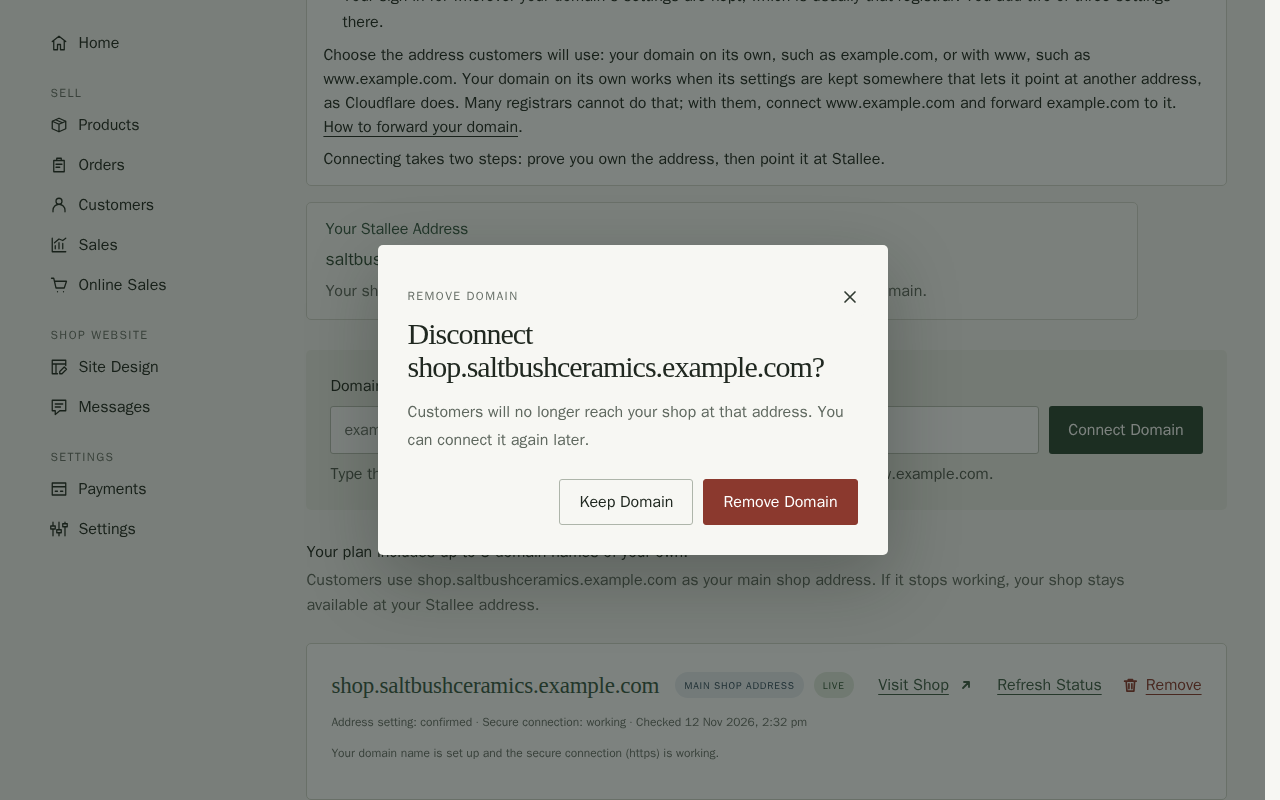
Visitors can then no longer reach your shop through that address. Your shop stays at its Stallee address, and you can connect the domain again later once removal has finished. Remember to delete the CNAME setting at your DNS provider too.
Redirects for an Old Website
If your domain used to belong to a Shopify or Squarespace shop, links to its old pages, such as /products/blue-mug, stop working when the domain points to Stallee. Redirects send those visitors, and search engines, to the right page on your new shop. They are at the bottom of the Website Address page, under Redirects. Your shop keeps up to 500, and a redirect only applies where your shop has no page of its own.
To find the new address, open the page on your shop and copy everything after your domain name, such as /products/blue-mug. You can also use a full address starting with https:// to send visitors somewhere else.
Add One Redirect
- Type the old address in Old Address, such as
/products/blue-mug. - Type the new address in New Address.
- Leave Type as Moved for good unless the move is temporary, then choose Add Redirect.
Choose Edit or Delete beside a redirect to change or remove it. Each one shows how many times visitors have used it, so you can see which old links still matter. The list shows 25 redirects at a time; use the page numbers under it to see the rest.
Import Redirects from Shopify or Squarespace
- In Shopify, open the URL redirects page in your online store settings and choose Export. The file has the headings
Redirect fromandRedirect to. In Squarespace, open URL Mappings under Developer Tools and copy the lines in the box. - On the Website Address page, under Import Redirects, choose your file, or paste the rows into Or Paste Rows.
- Choose Check File. Stallee shows how many redirects will be added, how many already exist and are skipped, and which rows cannot be imported and why. Nothing is saved yet.
- Fix the problems in your file and check it again, or choose the Import button, which shows how many redirects it adds.
Stallee skips rows with an old address that already has a redirect, a new address that points back to the old one, or an address Stallee keeps for itself, such as /cart.
Test an Address
Type an old address in Address to Test and choose Test Address to see where visitors would go.
If You Change Plan
If your plan includes fewer domain names than you have connected, the extra ones show Paused by plan. They are paused, not removed. Free shops cannot connect new domains.
Next, make sure your site looks right in Site Design.