The Orders page lists every order placed on your website. Here you see what to pack, tell customers their order is on the way, and refund or cancel when something goes wrong. The examples follow Mara Quinn, who runs Saltbush Ceramics.
Find an Order
An order appears here once the customer has paid. Each one has an order number like #1001, a Payment status (such as Paid, Partially refunded or Refunded), a Fulfilment status (such as Unfulfilled, Partially fulfilled, Fulfilled or Not required when a refund left nothing to send) and its Delivery method: Shipping, Pickup, or Market with the date for an order collected at a market.
Order numbers count up for your shop from #1001, in the order customers paid, and the same number appears in the customer’s emails, on packing slips and on their order page. A checkout that was never paid has no number yet, so it shows a short code instead.
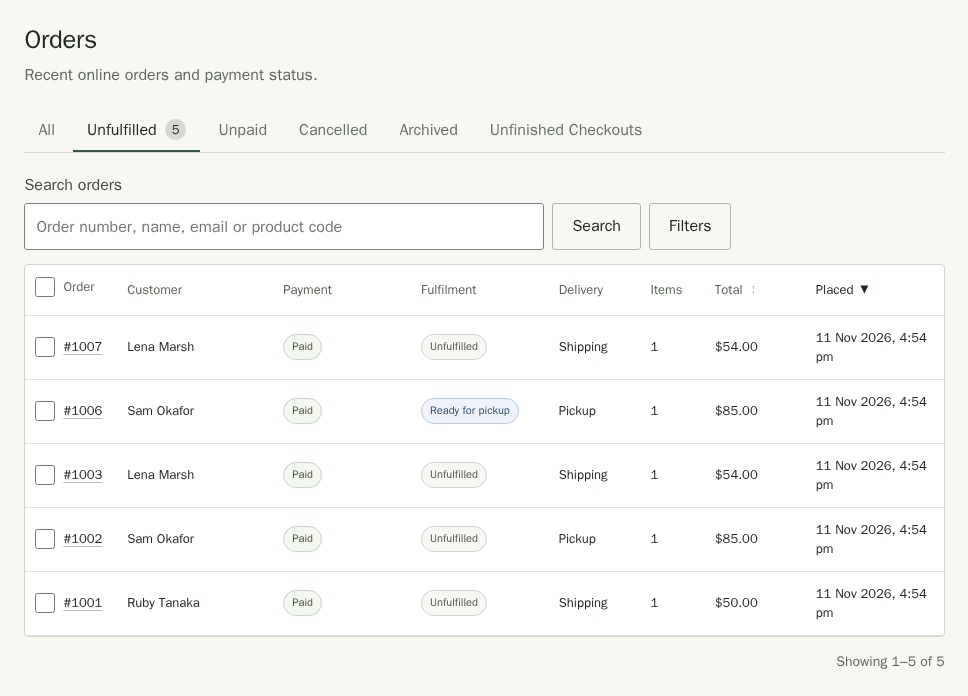
The tabs above the list sort your orders the way you work them. Orders opens on Unfulfilled while orders are waiting to be sent, and on All otherwise. On a phone, swipe across the tabs to see them all; the tab you are on stays in view.
- All shows your paid orders that are not archived. Orders you have finished with move to Archived, described below. If every order is archived, All says so and points you to the Archived tab.
- Unfulfilled is your to-do list: paid orders still to send or hand over, including orders that are only Partially fulfilled so far. The number beside it is how many are waiting. When orders are on hold, a note above the list says On hold with how many, and Show Held Orders lists them; each held order is marked On hold. When nothing is left, the tab says Nothing to send. You are all caught up.
- Unpaid shows custom orders whose balance is still to collect.
- Cancelled shows every order you cancelled, archived or not.
- Archived keeps the orders you have finished with out of the way. See Archive an Order below.
- Unfinished Checkouts shows checkouts a customer started but did not pay for, or whose payment failed or expired. These are not orders yet, and you cannot send them. If you have turned on abandoned checkout emails, this tab also shows how many reminders were sent and how many orders were recovered. A recovered order is marked Recovered wherever it appears.
The tab you choose stays in the page’s address, so you can bookmark it.
- Search by order number (such as 1001 or #1001), customer name, email or product code in Search orders, then choose Search.
- Choose Filters to narrow the list. Payment status picks out orders that are Paid, Partially paid (a custom order whose balance is still to come), Partially refunded, Refunded or that Need attention, where Stripe has raised a refund, dispute or review. Needs a stock check shows orders waiting on a stock check, described below. Fulfilment status picks out Unfulfilled, Partially fulfilled, Ready for pickup, Fulfilled or Picked up orders, and Delivery method picks Shipping or Pickup.
- Newest orders come first. Choose the Total or Placed heading to sort by it, and again to reverse it. On a phone, use Sort by.
Work on Several Orders at Once
Tick the box beside each order, or the box in the heading to pick every order on the page. A bar shows how many are selected, up to 50 at a time, and offers two actions.
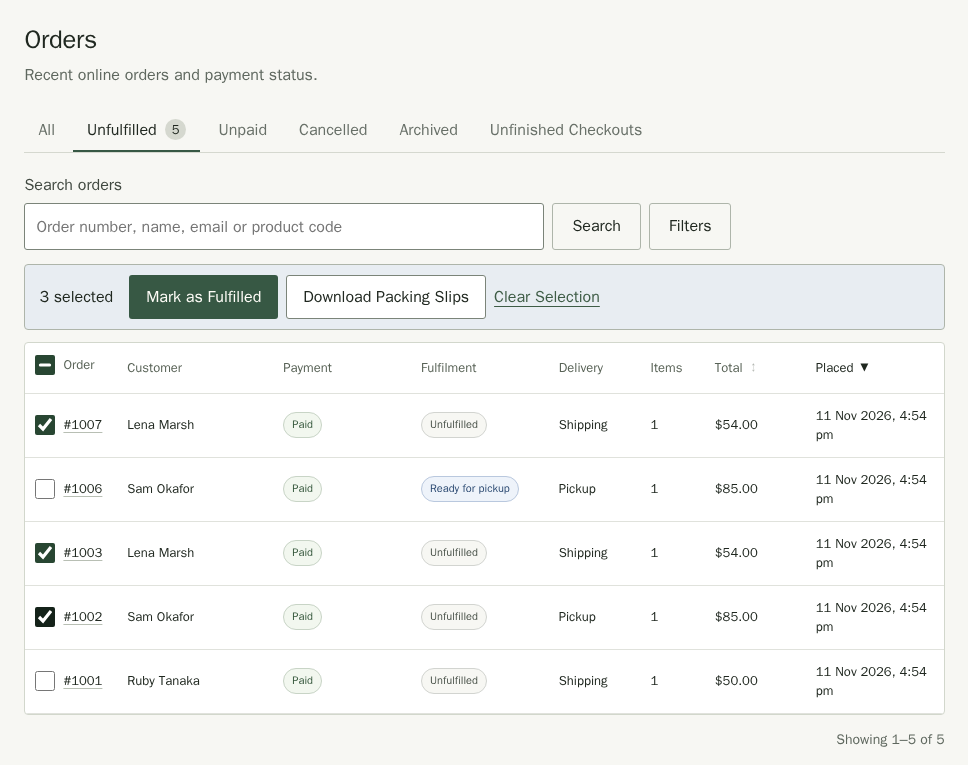
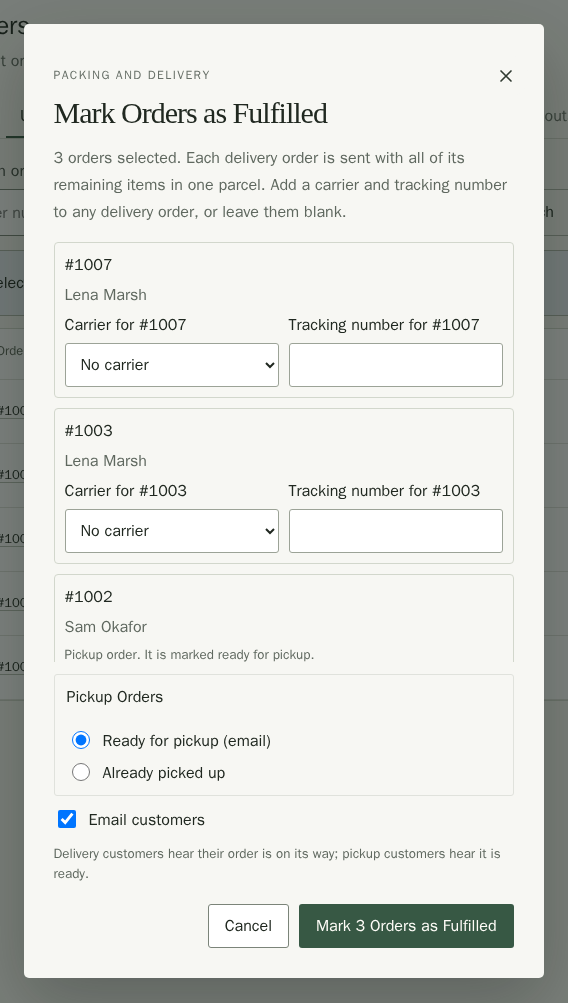
- Mark as Fulfilled opens a list of the selected orders. For each delivery order you can choose a carrier and add a tracking number, or leave them blank. Each delivery order is sent with all of its remaining items in one parcel, so an order you had already part-shipped is completed.
- For pickup orders, choose Ready for pickup (email) to tell the customer their order is ready to collect, or Already picked up to record that they have it, which sends no email.
- Email customers is ticked to start with: delivery customers hear their order is on its way, and pickup customers hear it is ready. Untick it to send no emails. Stallee says how many of the selected orders have no email address.
- Choose the button that says how many orders it will update, such as Mark 3 Orders as Fulfilled. Stallee then lists the customers it emailed and the orders it skipped, such as ones already fulfilled, cancelled, refunded or on hold. Release a held order first, or mark it fulfilled on its own. Fulfilled orders finish and archive as usual.
- Download Packing Slips makes one PDF with a packing slip for each selected order, listing only the items still to send on an order that is partly shipped. An order with no buyer or delivery details cannot have a packing slip, so it is left out of the PDF and the page tells you which.
Archive an Order
Archiving tidies the list without deleting anything. An archived order leaves All, Unfulfilled and Unpaid and their counts, and is listed under the Archived tab. It is still found by search: searching All includes archived orders, marked Archived.
By default an order archives itself as soon as it is finished: paid and fulfilled (every item shipped, or picked up), refunded in full, or cancelled. An order that is only partially fulfilled stays on your working lists until the last item has gone. Orders that were already finished when this was introduced are archived too. If an order is reopened with Mark as Unfulfilled, or a refund fails, it comes back to the working lists by itself.
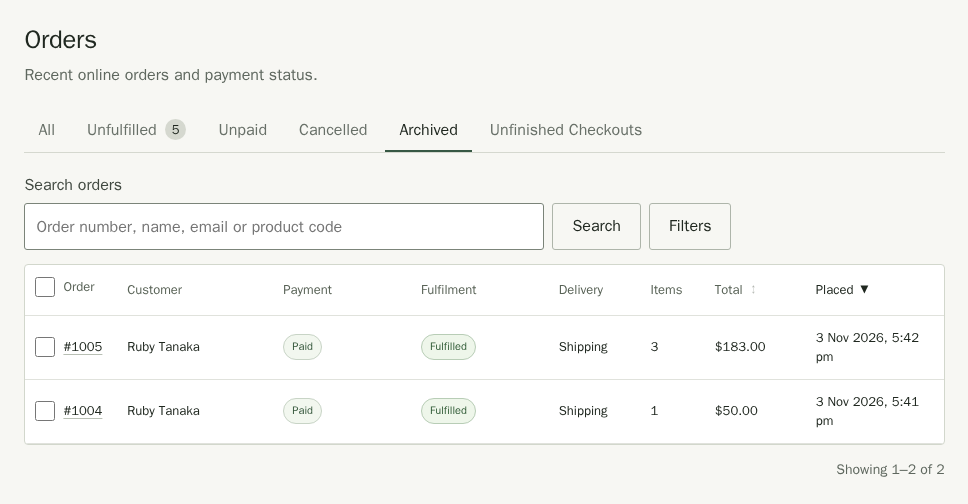
- To archive an order yourself, open it, choose More Actions and then Archive Order. Any team member can. It stays archived whatever happens next.
- To bring one back, open it from Archived or by search, choose More Actions and then Unarchive Order. It stays out of the archive until something new finishes it, such as being refunded in full.
- To archive only by hand, go to Online sales and untick Archive completed orders automatically, then Save Website Settings. Orders that archived themselves return to the working lists, and turning it on again archives them once more. Orders you archived stay archived.
Open an Order
Choose an order’s number in the list. The order opens on its own page, with an address you can bookmark or share with your team. Choose Back to Orders to return to the list as you left it.
The totals list the items, shipping, tax and total. For a shop in Australia, New Zealand, the United Kingdom or the EU the tax is already inside the prices, so an Includes line shows how much of the total it was. For a shop in the United States the sales tax is added on top of the prices at checkout, so it appears as its own Sales tax line before the total, and a refund of items gives back their share of it.
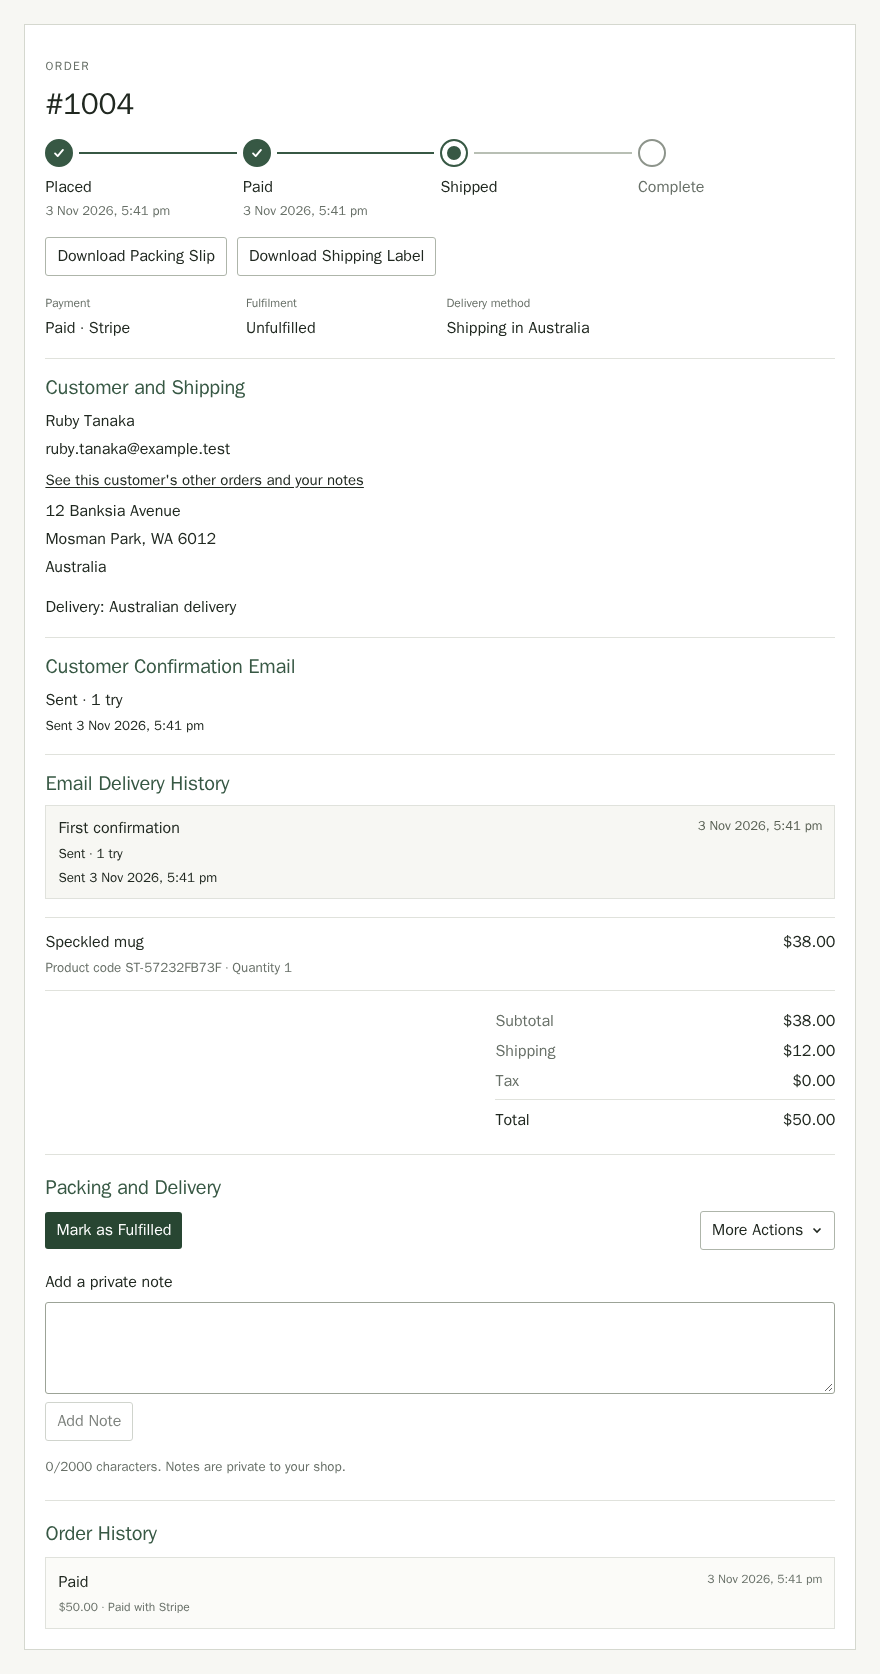
A progress line across the top shows where the order is up to: Placed, Paid, Shipped and Complete. A pickup order shows Ready for Pickup and Picked Up instead, and a custom order adds Balance paid. Each finished step has a tick and the date it happened, and the next step has a ring. A cancelled or fully refunded order ends with a cross at Cancelled or Refunded.
The details show:
- its Payment status and whether Stripe or Square took it, its Fulfilment status and its Delivery method,
- the customer and where to post it, with the delivery rate they chose and, if you ask these at checkout, whether they agreed to your terms and opted in to email (see Online sales),
- a Customer Note and a Gift Message when the customer wrote one,
- whether the confirmation email reached the customer,
- each item, with the subtotal, shipping and total. If the customer used a discount, a Discount row names it, such as Discount · MARKET10, and the subtotal above it is the amount before the discount,
- once something has been sent, each Shipment with the items in it, its carrier, tracking link and date,
- an Order History of everything that has happened to the order, starting with the payment: Paid, or Deposit paid and later Balance paid on a custom order, each with the amount and whether Stripe or Square took it.
Choose Download Packing Slip for a sheet to put in the parcel. If some items have already been sent, the slip lists only the items still to send, headed Items still to send; for an order with nothing sent yet, or all of it sent, it lists every item. The slip names the delivery rate and prints the customer's gift message and note after the items, so you can put the message in the parcel. Choose Download Shipping Label for a label to print and stick on it. For the label you first need to add your sending and return address in Settings. Names and addresses print as you entered them, macrons and other accents included. A character the documents cannot draw, such as an emoji, prints as a question mark.
The two downloads appear once an order is paid, and stay for every fulfilment status after that, including on hold, shipped and collected. An unpaid, expired or failed checkout, a cancelled order and a fully refunded order do not show them, and the same applies to the packing slips you download for several orders at once and to the order details your AI assistant reads.
To leave a reminder for yourself or your team, type it in Add a private note and choose Add Note. Customers never see notes.
Custom Orders
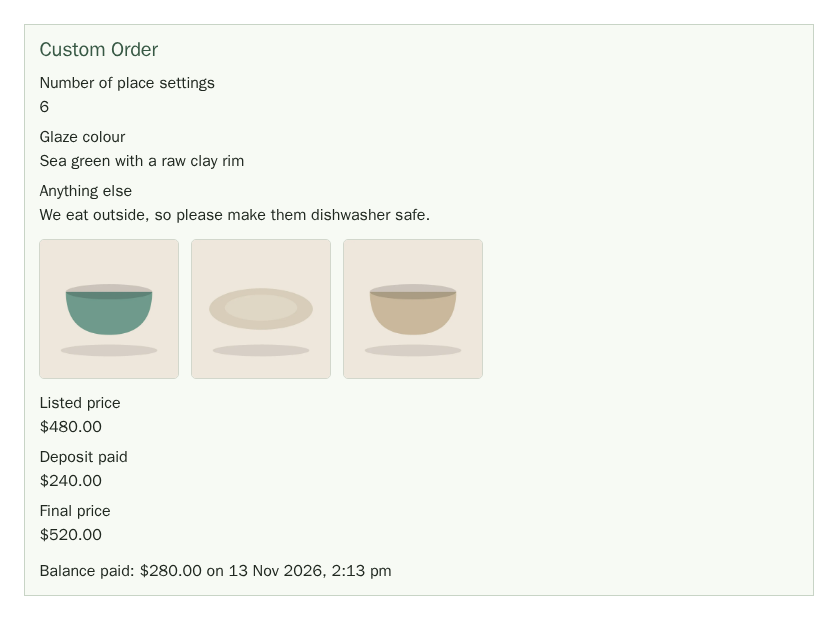
An order for a made-to-order product has a Custom Order section on its page, and the list marks it Custom order · balance due while the balance is still to collect. It shows what the customer asked for, so you know what to make. See Products for how to set one up.
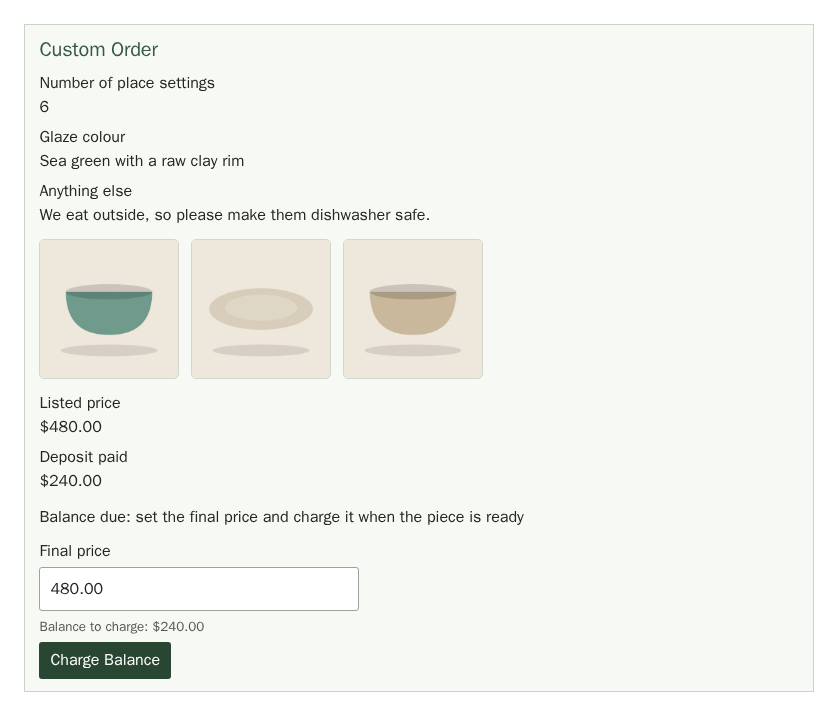
- The customer’s answers to your questions, and any reference images. Choose an image to open it full size.
- The Listed price, and the deposit the customer paid as Deposit paid.
- Balance due, a reminder that the rest is still to collect. When the piece is finished you set the final price and charge the balance, as described below.
The customer also paid shipping when they ordered. Once the balance is paid, ship the order the same way as any other.
Fulfil a Delivery Order
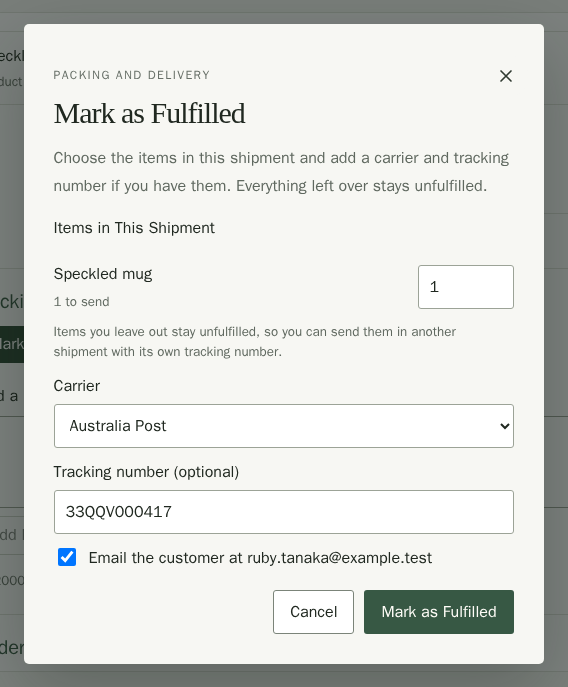
- Open the order and choose Mark as Fulfilled.
- Under Items in This Shipment, leave every quantity as it is to send the whole order in one parcel. To send only some of it, lower a quantity or set it to 0.
- Pick the Carrier: Australia Post, Sendle, StarTrack, CouriersPlease, Aramex or Other carrier.
- Type the Tracking number (optional). It can use letters, numbers, spaces and hyphens. You need to pick a carrier first.
- Leave Email the customer ticked to send them an “on its way” email with the tracking link, or untick it to stay quiet.
- Choose Mark as Fulfilled.
The order now reads Fulfilled and shows its carrier and tracking number under Shipment, with a Track parcel link for the main carriers. Shipping Emails records whether the customer's email was sent, and Order History notes Customer emailed.
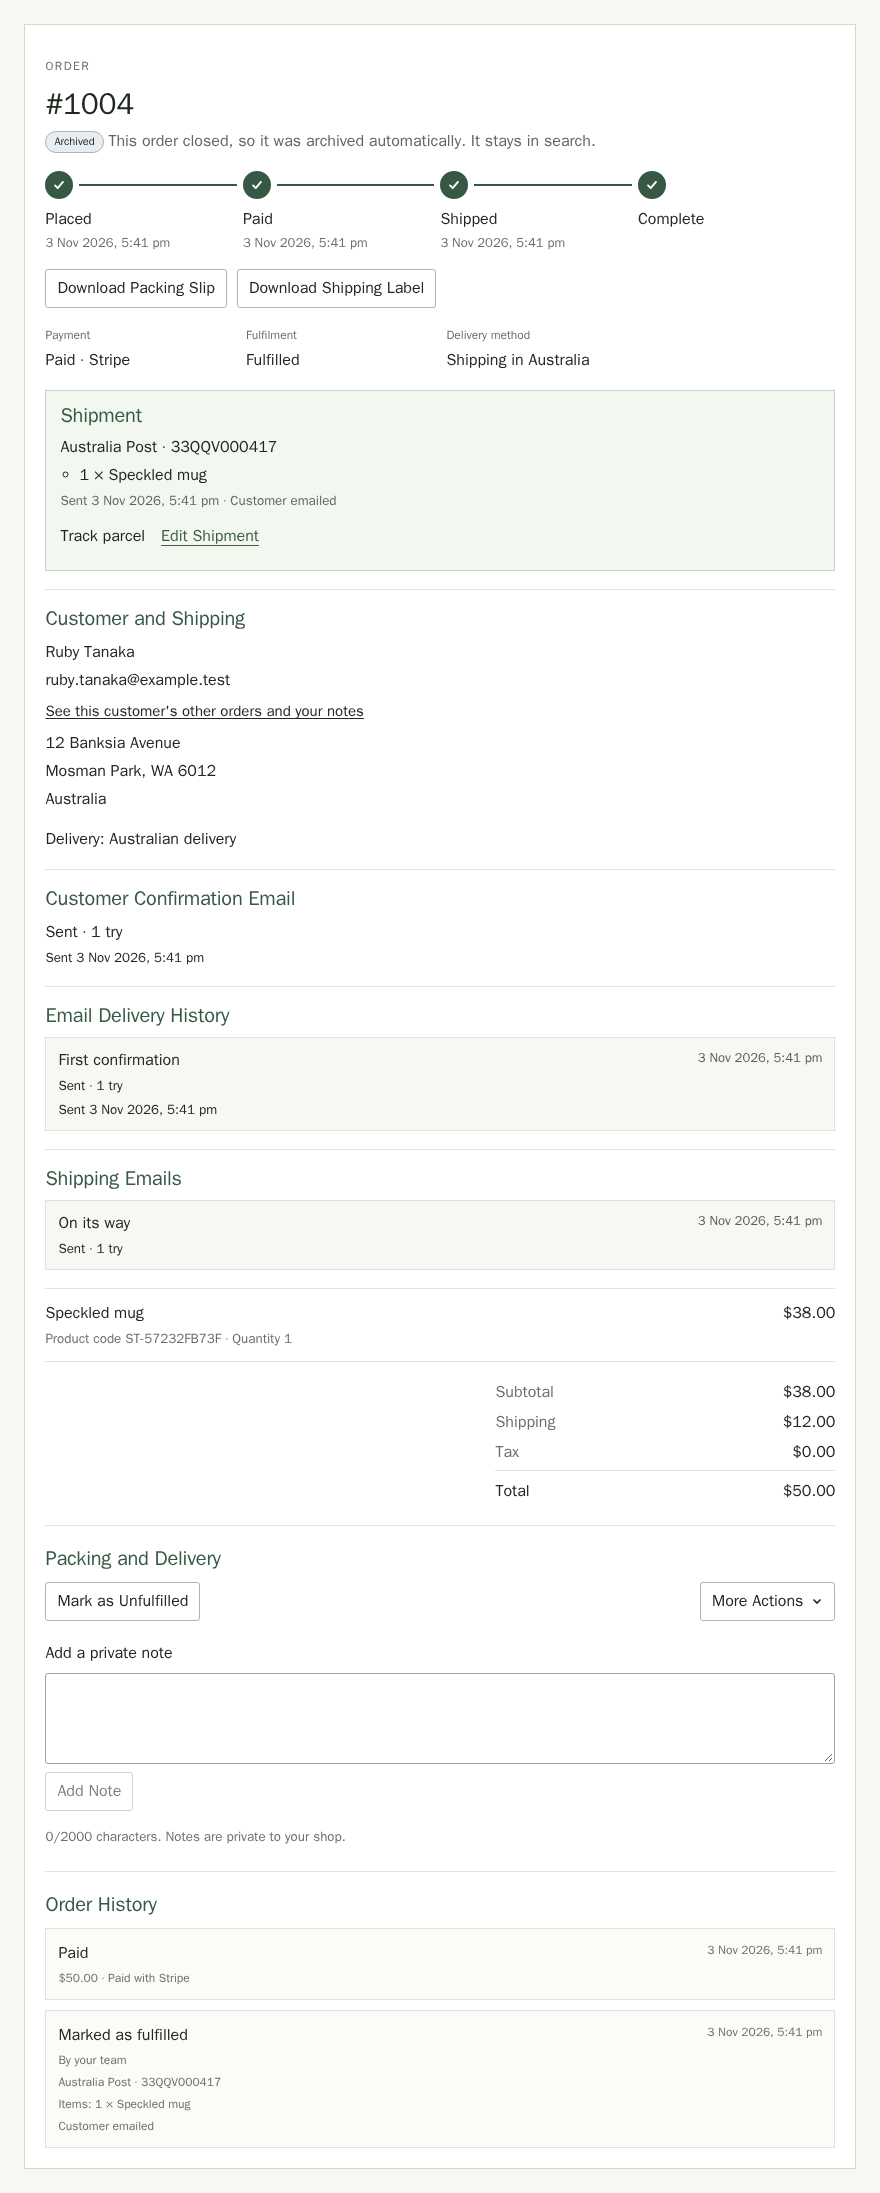
Made a mistake? Choose Edit Shipment beside the shipment to fix its carrier or tracking number. You can choose to email the customer the update. Mark as Unfulfilled puts the order back to Unfulfilled: its shipments stop counting as sent, though they stay in Order History.
When an Order Is Put on Hold for Postage
Postage is priced from the country, and for Australia the postcode, that the customer chooses in their cart, but Stripe and Square ask for the delivery address afterwards. If that address is in a place where the same postage rate would have cost more than they paid, or where the rate does not apply at all (a different country from the one they chose, for example), the order is put on hold as soon as it is paid. Orders that cost the same or less to post, and pickup and digital orders, are left alone.
The order reads On hold, and a note under the delivery address says what happened: the postcode or country postage was priced for, the rate and what the customer paid, and the postcode or country they gave at payment with what that rate costs there. Order History records Put on hold with the same note, and the new order email you get repeats it. You have three ways to settle it:
- Ask the customer for the difference, then choose Release Hold and send the order. Stallee has no payment link for extra postage, so collect it outside Stallee, for example by invoice or a message to the customer.
- Refund the order, as described in Refund an Order.
- Send it anyway. Choose Mark as Fulfilled as you would for any other order. The note stays in Order History.
Release Hold takes the order off hold without sending anything: it goes back to Unfulfilled, nobody is emailed, and Order History adds Hold released beneath the original Put on hold note. The order is never put on hold for postage a second time. Orders on hold are skipped when you mark several orders as fulfilled at once. Orders that Stripe or Square flagged for attention are also shown as on hold; check the payment, then mark those fulfilled on their own.
If you change your shipping rates between a customer choosing postage and paying, the order is not put on hold, because the old rates no longer apply.
Send an Order in More Than One Parcel
When items leave at different times, or in different parcels, send them one shipment at a time. Each shipment has its own items, carrier and tracking number, and its own email to the customer.
- Choose Mark as Fulfilled and set the quantities for the first parcel. Items you leave out stay unfulfilled.
- Add the carrier and tracking number for that parcel, decide whether to tick Email the customer, and choose Mark as Fulfilled.
- The order now reads Partially fulfilled and stays on the Unfulfilled tab. Its page shows how many items are fulfilled, and the first Shipment.
- When the rest is ready, choose Mark as Fulfilled again. The quantities start at what is still to send, so you can usually just add the next parcel’s carrier and tracking number.
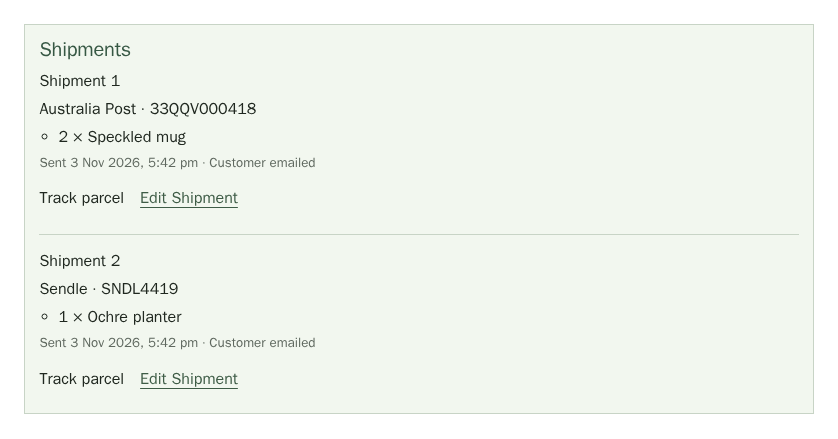
The order reads Fulfilled once every item is in a shipment, and it can then archive. Order History has one entry for each shipment, with its items. A customer who gets an email for each parcel sees only the items in that parcel and its own tracking link. Items you have refunded do not need sending, so refunding the last unsent item completes the order.
Hand Over a Pickup Order
Customers who choose local pickup have no postal step. Instead you tell them when it is ready, then record the handover.
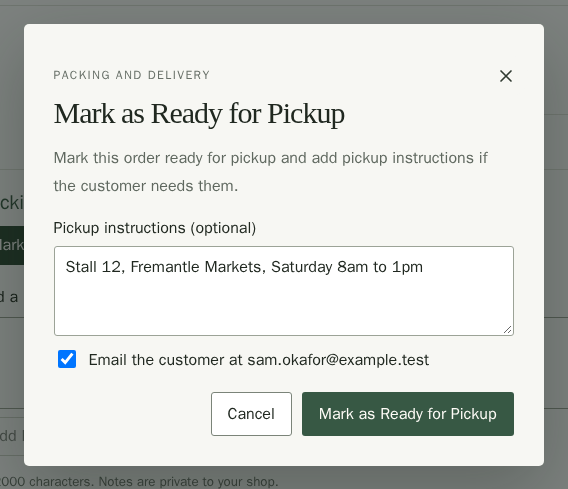
- Open the order and choose Mark as Ready for Pickup.
- Add Pickup instructions (optional), such as where and when to meet. If you leave the email box ticked, the customer gets these details in an email.
- Choose Mark as Ready for Pickup.
- When they pick it up, open the order and choose Mark as Picked Up.
Pack and Hand Over Market Orders
An order a customer chose to collect at a market shows Market and the date in the Delivery column. You set this up on the Online Sales page. To see everything for one market day:
- Choose Filters, then pick the market and date under Market. Look in the All tab to include orders you have already handed over.
- Use To Pack to pack your boxes. It adds up each item across the orders still to hand over.
- Use To Hand Over at the stall. It lists each order, the customer’s name and their items.
- Choose Print List to take a paper copy with you.
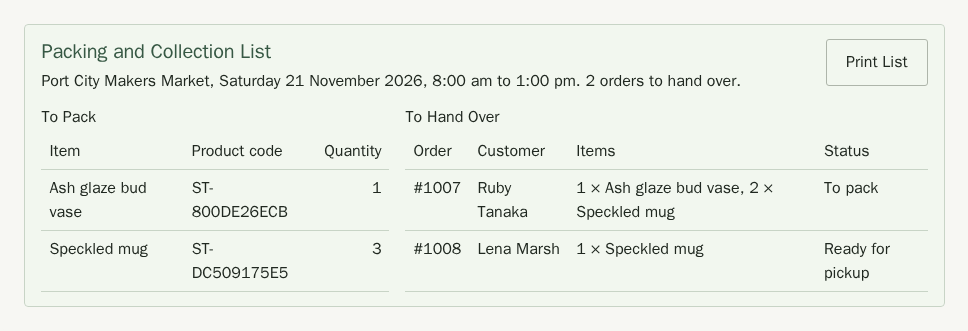
Mark each order the same way as any pickup order: open it, choose Mark as Ready for Pickup when it is packed, then Mark as Picked Up when you hand it over. Orders you have handed over leave the To Pack list.
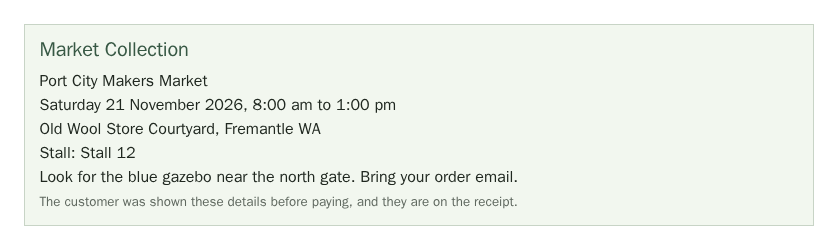
The order page has a Market Collection box with the market, date, hours, stall and instructions exactly as the customer saw them when they paid.
Orders with Digital Downloads
When someone buys a digital download, the confirmation email and their order page carry the download links, and the order is marked as fulfilled with no parcel to send. The order shows Digital Items, with how many times each file has been downloaded. Choose More Actions and then Resend Download Links to email the same links again, or Reset Downloads to give the customer a fresh download limit and validity period. Order History records both. See Products to set up a digital download.
Refund an Order
Refunds go back to the customer's card through Stripe. You can refund chosen items, part of the shipping, or any amount you like, up to what is left to refund on the order.
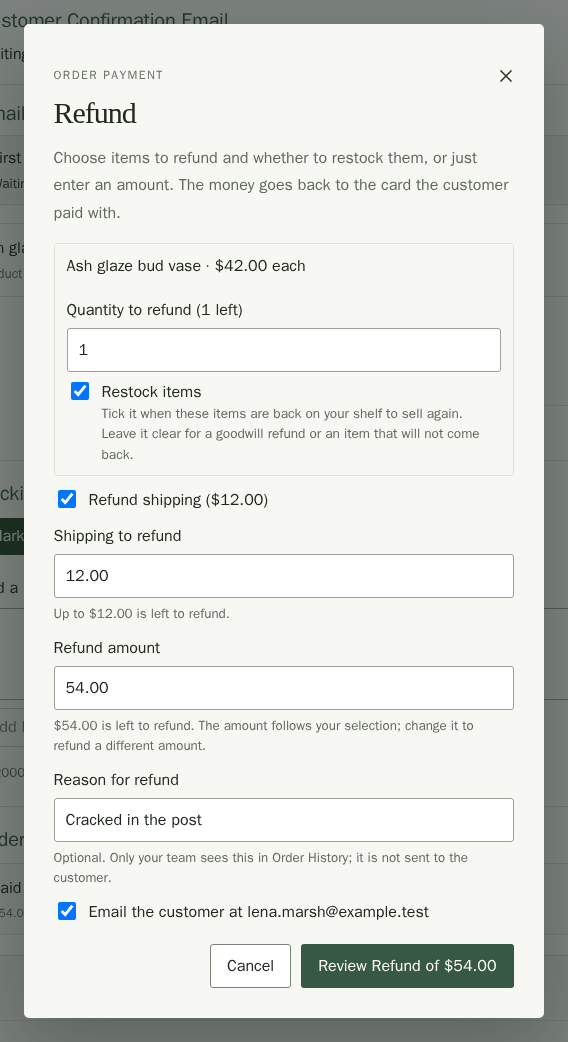
- Open the order, choose More Actions and then Refund.
- For each item, set Quantity to refund.
- Check Restock items. It starts ticked for items you have not sent yet, since they are still on your shelf, and unticked for items already sent. Tick it when sent items come back to you to resell. Leave it clear for a goodwill refund or an item that is broken or lost.
- Tick Refund shipping if you are refunding the delivery charge too. Lower Shipping to refund to refund only part of it.
- Check Refund amount. It adds up your choices for you. Type a different amount to refund less, or more, such as $5 as a goodwill refund with no items chosen. Stallee will not let you refund more than is left, and tells you how much that is. With no items chosen, it says your stock will not change.
- If you like, fill in Reason for refund. Only your team sees it, in Order History. It is never shown to the customer or put in their email.
- Choose the button that shows the amount, such as Review Refund of $54.00.
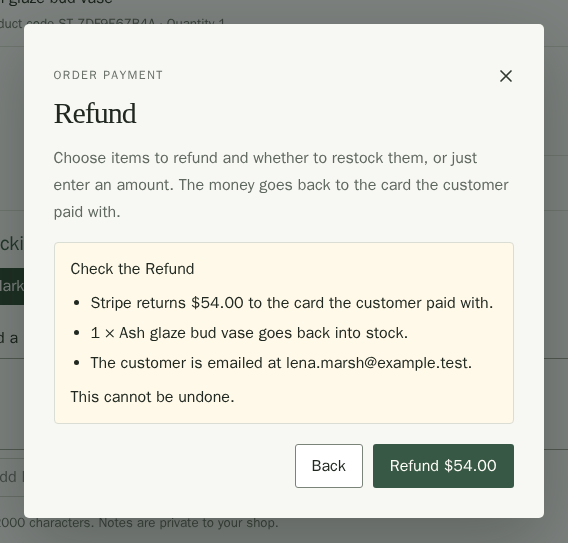
Stallee then shows what the refund will do: the amount going back to the customer, how many of each item go back into stock (or that stock will not change), and whether the customer is emailed. A refund cannot be undone. Choose Back to change anything, or Refund $54.00 to send it.
The order then lists the refund under Refunds, and Order History records it. Both say how it ended: Refunded once the money is on its way back, Refund pending while Stripe confirms it, or Refund failed if Stripe declined it, in which case nothing went back to the customer. If Stripe could not be reached, the refund is saved and you can choose Try Refund Again in a moment.
If the order used a discount, refunding an item returns what the customer actually paid for it: the item's share of the discount is taken off, so Refund amount will be lower than the item's full price. The Discounts guide explains how discounts work.
An order paid through Square refunds through Square in the same way. See Refunds and disputes on Square orders.
Cancel an Order
Cancel an order when a customer changes their mind before you have fulfilled it. Open the order, choose More Actions and then Cancel Order. The choice is not offered once any item has been fulfilled (even in a partly shipped order) or the order is picked up. Refund the items instead.
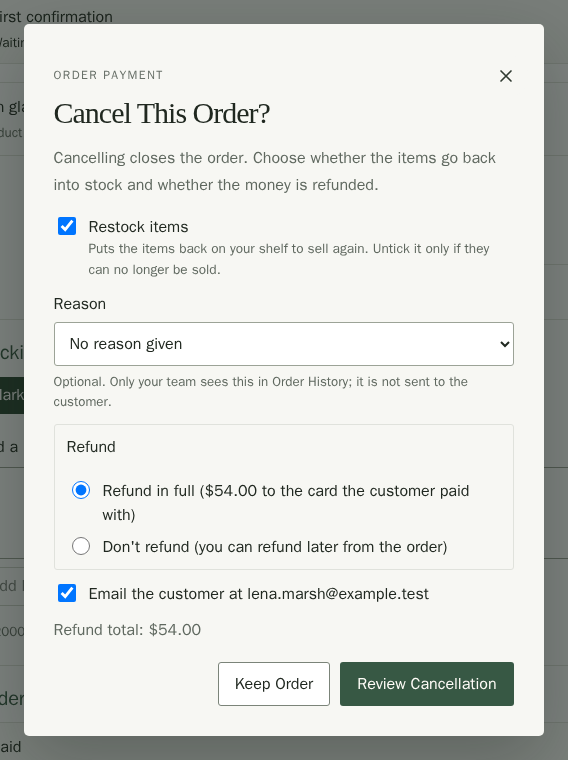
- Leave Restock items ticked to put every item back on your shelf to sell again. Untick it only if they can no longer be sold; the stock then stays as it is.
- Choose a Reason if you like: Customer changed mind, Out of stock, Fraud or suspicious, or Other. Only your team sees it, in Order History. It is never shown to the customer or put in their email.
- Choose Refund in full to send everything still owing back to the card, or Don’t refund to cancel without returning any money. You can still refund the order later from More Actions, up to what is left.
- Tick or untick Email the customer, then choose Review Cancellation.
- Check what the cancellation will do, then choose Cancel and Refund or Cancel Order. It cannot be undone.
Charge the Balance for a Custom Order
A custom order’s buyer pays a deposit and shipping at checkout, and their card is saved for the rest. When the piece is finished, open the order and find the Custom Order section.
- Type the Final price. It starts at the listed price and can’t be less than the deposit already paid. Balance to charge shows what is left after the deposit.
- Choose Charge Balance.
- Check the amount in the box that opens, then choose the button that shows it, such as Charge $280.00.
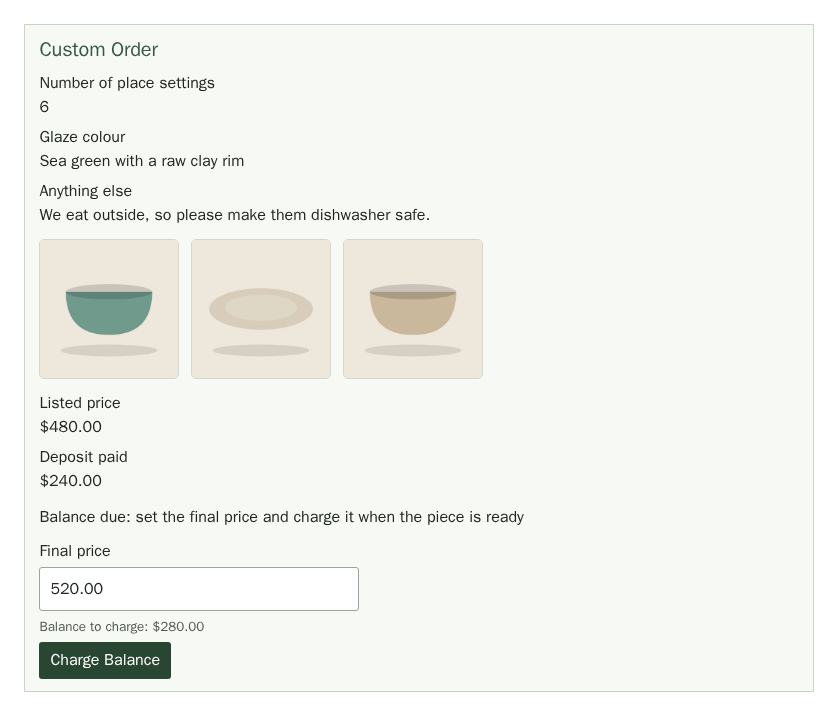
Stallee charges the customer’s saved card and emails them that their piece is ready, with the final price, the deposit and the balance. The section then shows Balance paid with the amount and the date, and the list marks the order Custom order � balance paid.
The totals under the items then add Balance paid and Total paid below Total. Total stays the deposit and shipping the customer paid when they ordered. Total paid, which is also what the Orders list shows in its Total column, is everything they have paid so far, and is what a refund can return.
Order History also lists Deposit paid when the customer ordered and Balance paid when the balance came in, each with the amount.
If the final price is the same as the deposit, there is nothing to charge, and choosing Mark Paid in the box settles the balance.
Only the shop owner and admins can charge the balance. Team members see the section but not the button.
When the Bank Needs the Customer
Sometimes the customer’s bank asks them to approve the payment, or declines the saved card. Stallee then emails the customer a link to pay the balance, and the order says that the bank needs the buyer to approve the payment and that we emailed them a link. The link works for about a day. If they lose the email, or it expires, choose Send Payment Link Again. When the customer pays, the order changes to Balance paid by itself.
Send the Piece
Mark as Fulfilled and Mark as Ready for Pickup stay switched off until the balance is paid, with a note saying Charge the balance before sending this order. Once it is paid, ship the order the same way as any other.
Refund a Custom Order
Refund and Cancel Order (both under More Actions) can return everything the customer paid: the balance first, then the deposit and shipping. Check Refund amount before you confirm, as described in Refund an Order above. You can refund any amount up to what the customer has paid so far, deposit and paid balance together, less earlier refunds.
For a custom order paid through Square, the balance is an emailed Square payment link instead. See Custom order balances on Square.
Check Stock After a Refund in Stripe
If you refund an order in Stripe instead of in Stallee, Stallee does not change your stock. The order shows a Stock Check label, and its Stock Check section lists the items with an Adjust stock link to each product's Stock section. Check what came back, adjust the stock, then choose Mark Stock Checked on the order. You can add a note first. Only the shop owner and admins can mark the stock check as done; for other team members the button is greyed out with a note saying so.
Know When an Order Comes In
Stallee emails your notification addresses when an order is paid, with the items, totals, delivery method and a button to the order. The Messages guide shows where to set the addresses and how to turn these emails off.
What Your Customers’ Emails Look Like
Order confirmations, shipping emails and refund emails come from your shop: they arrive from “Saltbush Ceramics via Stallee” and their subjects name your shop. Each one has your published logo on your site header’s colours, linked to your website. Without a logo, your shop’s name shows instead. When a customer replies, the reply goes to the first address in your notification emails, or to your contact form’s address if you have not set any.
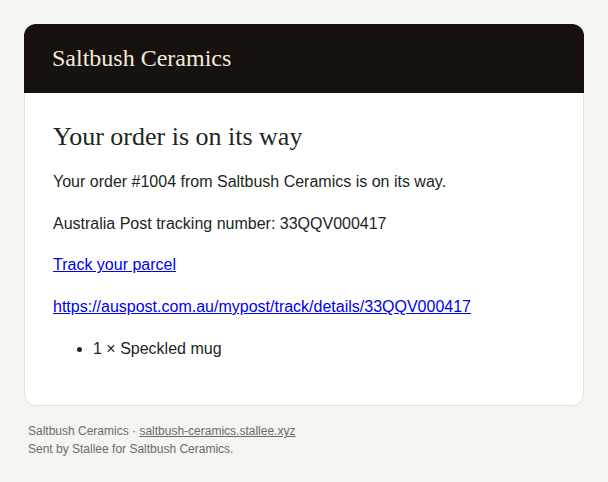
Order confirmation, tracking and balance-payment emails show the full address beneath each action link or button. Customers can open the link or copy and paste it into their browser.
Emails use your site as it was last published. Change your logo or colours in Site design and publish to update them.