Products are what you sell. Each one has a name, a description, a price and photos, and you decide whether it shows on your website. You manage them all on the Products page. The examples follow Mara Quinn, who runs Saltbush Ceramics.
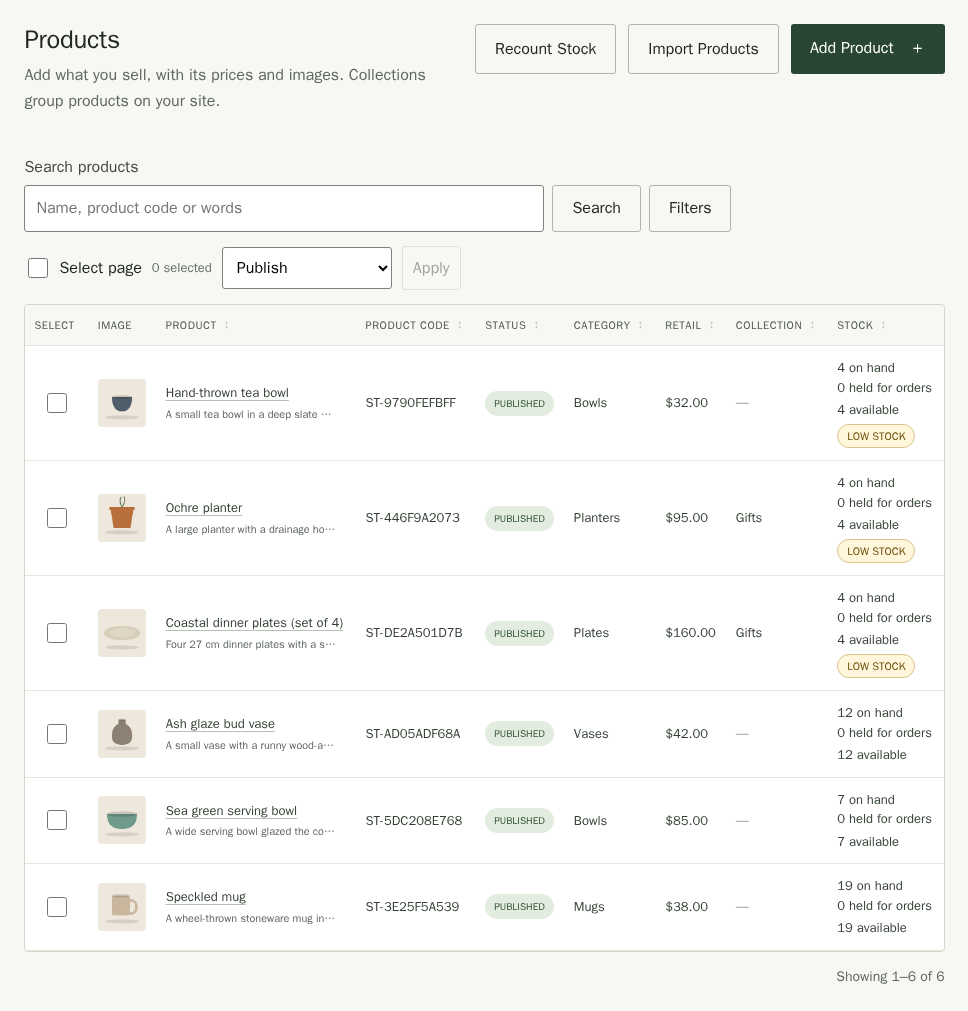
The list shows each product's photo, status, price and stock. Use Search Products to find one by name, product code or description. To narrow the list by Status, Category or Collection, choose Filters, set them and choose Apply Filters; the Filters button shows how many are in use. The product code is a short code Stallee gives every product, such as ST-DA1C19844D.
Choose a column heading, such as Product, Retail or Stock, to sort by it, and choose it again to reverse the order. On a phone, use Sort by above the list. The list starts with the products you changed most recently; on a phone, Recently updated returns to that order.
If you move back to Free with more than 20 published products, the extra products stay saved in your shop. Customers can open only the product pages in your showcase. Basic and Pro show all published products.
Add a Product
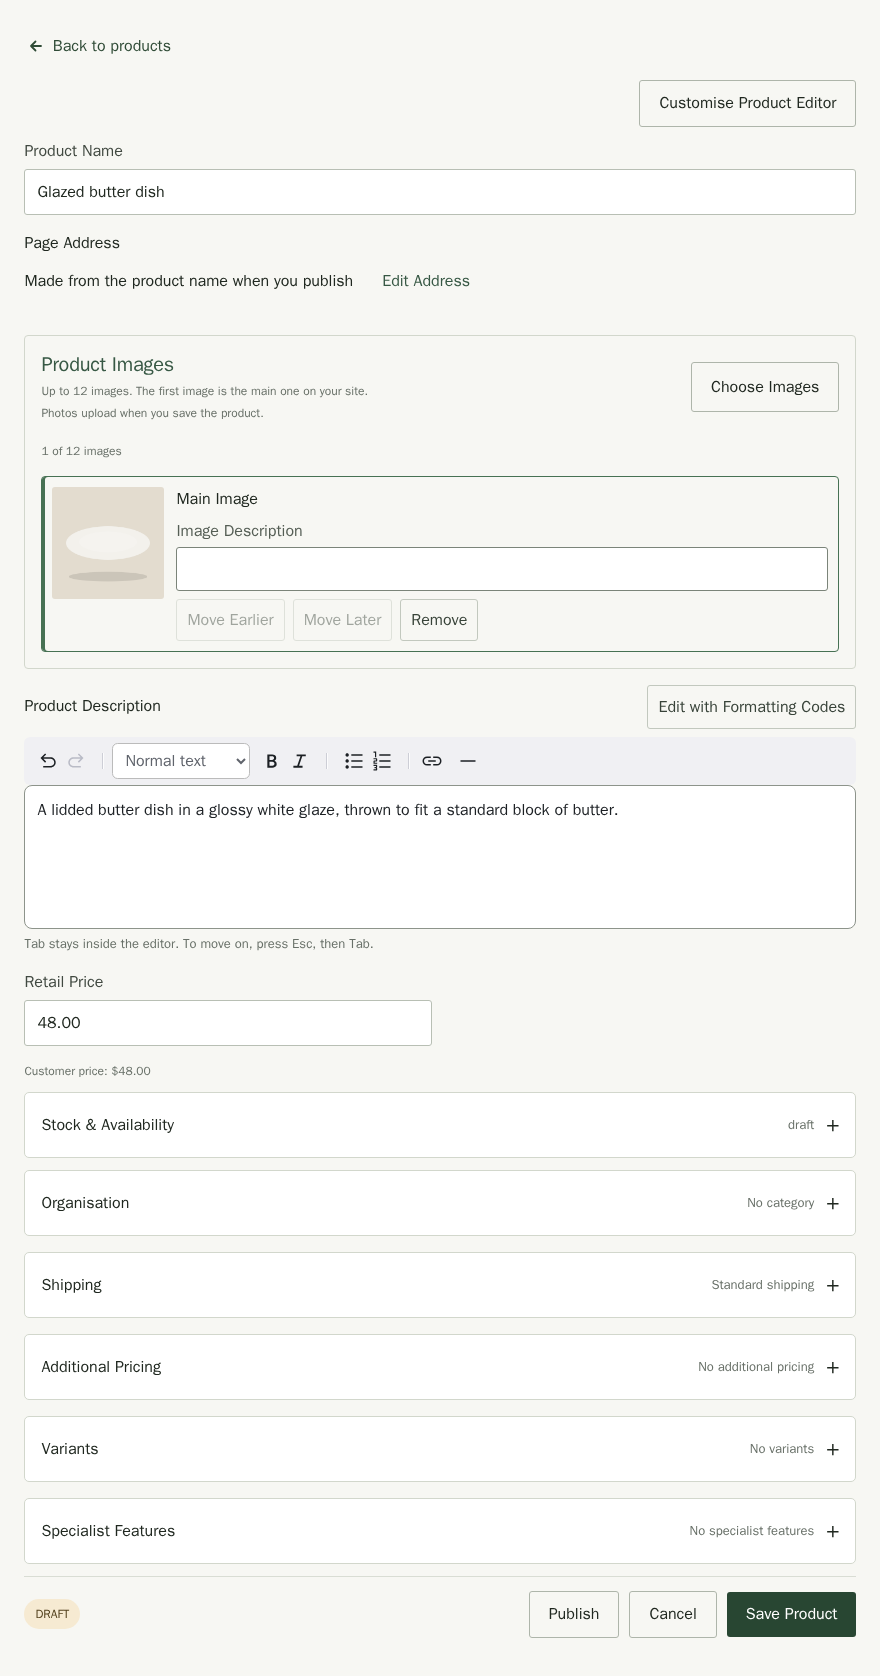
The first screen keeps the essentials together: name, photos, description and retail price. Open the compact sections below when you need stock, organisation, shipping or optional selling fields. With a keyboard, Tab to a section heading and press Enter or Space to open or close it.
- Choose Products in the menu, then Add Product.
- Type a Product Name, for example Glazed butter dish.
- Choose Choose Images to stage photos before saving. You can add up to 12 JPEG, PNG, WebP or GIF images, each 10 MB or smaller. Check the previews, change their order and add an Image Description for each one. The first photo is the main image. Photos upload when you save the product.
- Describe the product in Product Description. The toolbar above it formats your words: Bold, Italic, the text style list for headings and quotes, Bulleted list, Numbered list, Add a link and Add a divider. Choose Edit with Formatting Codes if you prefer to type the formatting yourself, and again to go back.
- Type the Retail Price. Prices are in your shop's currency, which is set in Settings. The field starts empty with a 0.00 hint, so type the whole price, such as 48.00, and use 0 for a free product. The line under it, Customer price, shows how it will read on your site.
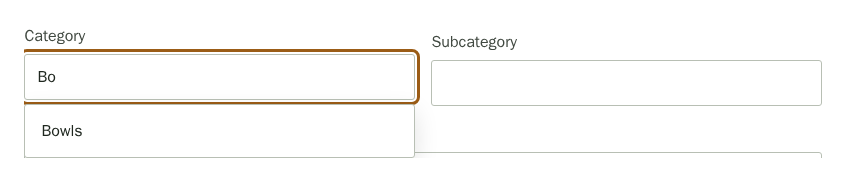
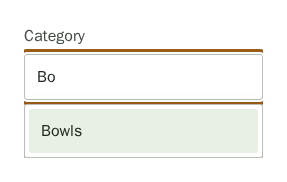
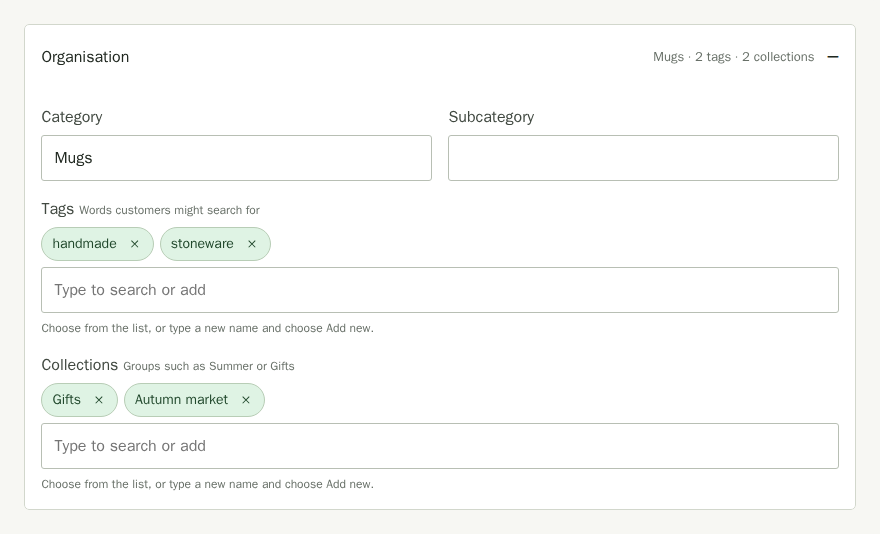
- If you like, open Organisation to add a Category, Subcategory, Tags and Collections. Start typing a category or subcategory to choose a value you have used before, or type a new one. Use the arrow keys and Enter to choose a suggestion, or Escape to keep your typed value. For tags and collections, start typing and choose one from the list, or choose Add new for one you have not used before. Each one you choose shows above the box, with a cross to remove it.
- Choose Save Product. Stallee saves the product as a draft, then uploads your staged photos, and says Saved as a draft. It is not on your site yet. If a required field is empty or wrong, Stallee opens the relevant section and shows what to fix.
- Add stock in Stock & Availability, then choose Publish when you are ready for customers to see the product.
Stallee remembers the sections you open and close for your account and shop in this browser. Your choices carry across products and return visits, so you can keep the fields you use ready to edit.
If you leave the page with changes you have not saved, Stallee asks whether to Leave Without Saving.
Publish a Product
The bar at the bottom of the product editor shows whether customers can see the product: Draft while it is private and Live once it is on your site.
- Open the draft product.
- Choose Publish. Stallee saves any changes you have made, puts the product on your site and shows Published. It is live on your site. The badge changes to Live.

When you save a draft from the editor, Stallee returns you to the list and says Saved as a draft. It is not on your site yet. Choose Publish beside that message to publish it straight away.

Add Photos
You can stage photos before your first save. After saving, the product stays open and shows its uploaded Product Images between the name and description. You can add more photos there later.
- Choose Choose Images to add another photo to the saved product. You can also drag image files onto the page.
- The first image is the Main Image. It is the photo customers see first, and the one in your product list.
- Describe each photo in Image Description, for example "Glazed butter dish with its lid on". People who use screen readers hear this instead of seeing the picture.
- Use Move Earlier and Move Later to change the order. Choose Delete Image to remove one. Stallee asks you to confirm.
If the order does not save, your photos stay in their previous order. Choose the same move again to retry.
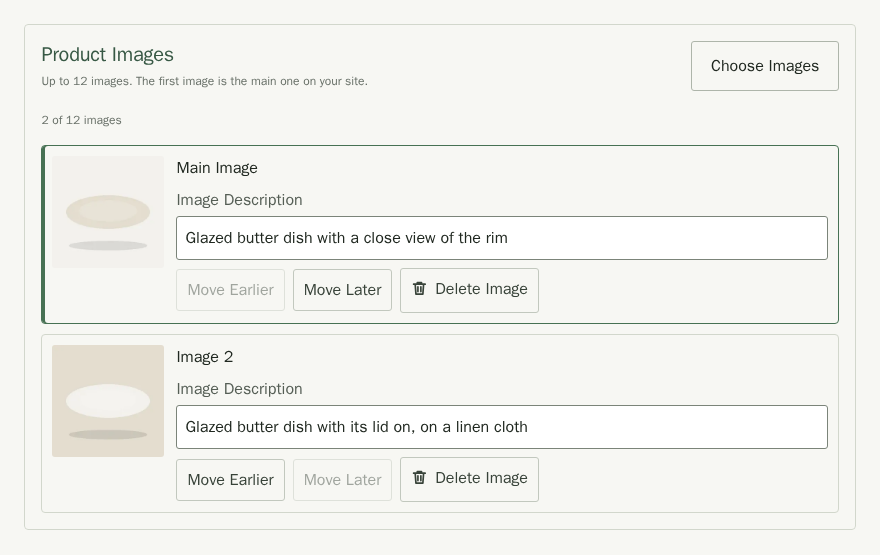
The Free plan has an allowance for product images. Basic and Pro do not limit how many you add.
Add a Product Video
Show how a piece is made or used with one short video. Each product can have one video, and it follows the photos on the product's page. The video must be an MP4 file with H.264 video and AAC audio, which most phones and editing apps can save. It can run for up to 30 seconds and be up to 25 MB. It counts toward your shop's image and video storage.
- Save the product and add at least one photo. The video uses one of your photos as its poster.
- Open the product and find Product Video, under Product Images.
- Under Poster Image, pick the photo people see before they play the video.
- Type a Video Caption. It shows under the video on your site, and it tells people who cannot watch what the video shows.
- Choose Choose Video, pick your MP4 file, then choose Upload Video.
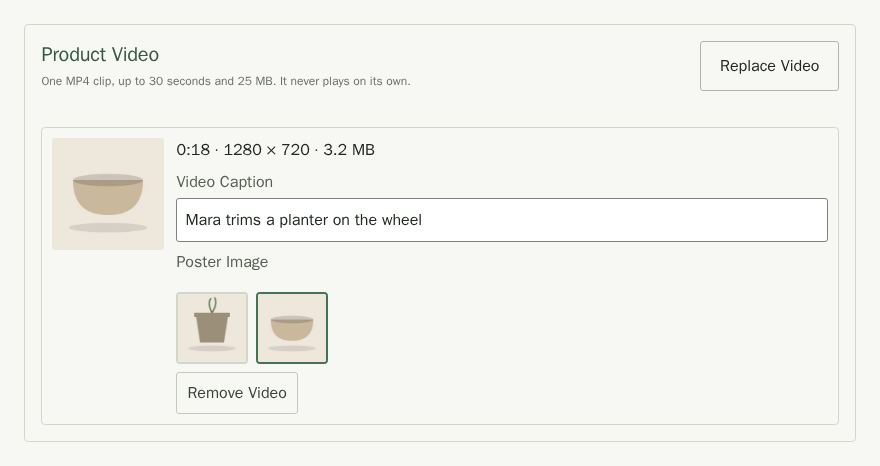
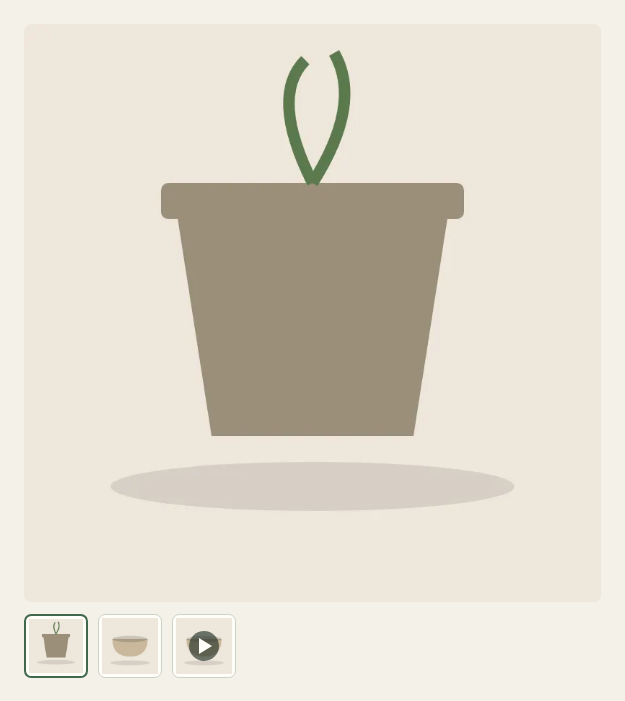
Customers see the poster as a thumbnail after your photos, marked with a play arrow. When they choose it, the video appears with your caption beneath it. It never starts by itself, and it does not loop.
To change the caption, edit it and click away. To change the poster, pick another photo. Choose Replace Video to upload a new file; Stallee asks you to confirm and keeps the old video until the new one is ready. Choose Remove Video to delete it. You cannot delete a photo while it is the poster, so pick another poster first.
If Stallee refuses a file, it says why: only MP4 videos with H.264 video and AAC audio can be uploaded, the clip must be 30 seconds or shorter, and the file must be under 25 MB. A video is hidden from your site whenever its product is, for example when you unpublish the product. A duplicate of a product does not copy its video.
Choose Which Fields Appear
The optional fields you see in the editor are a shop-wide choice. Owners and admins can change them for everyone who edits products in your shop. You can still open a product to see fields that already hold information, even when you have hidden those fields from new products. Hiding a field does not remove saved information or turn a selling feature on or off.
- Open any product or choose Add Product, then choose Customise Product Editor.
- Tick the optional fields you want to see, such as Sale Price, Sizes, Colours and Other Choices or Product Add-Ons. Each choice says what it is for and which section it appears in: Additional Pricing, Variants or Specialist Features. Used in this shop marks a feature already present on a product.
- Choose Save Editor Choices. This saves your shop's editor layout separately from Save Product.
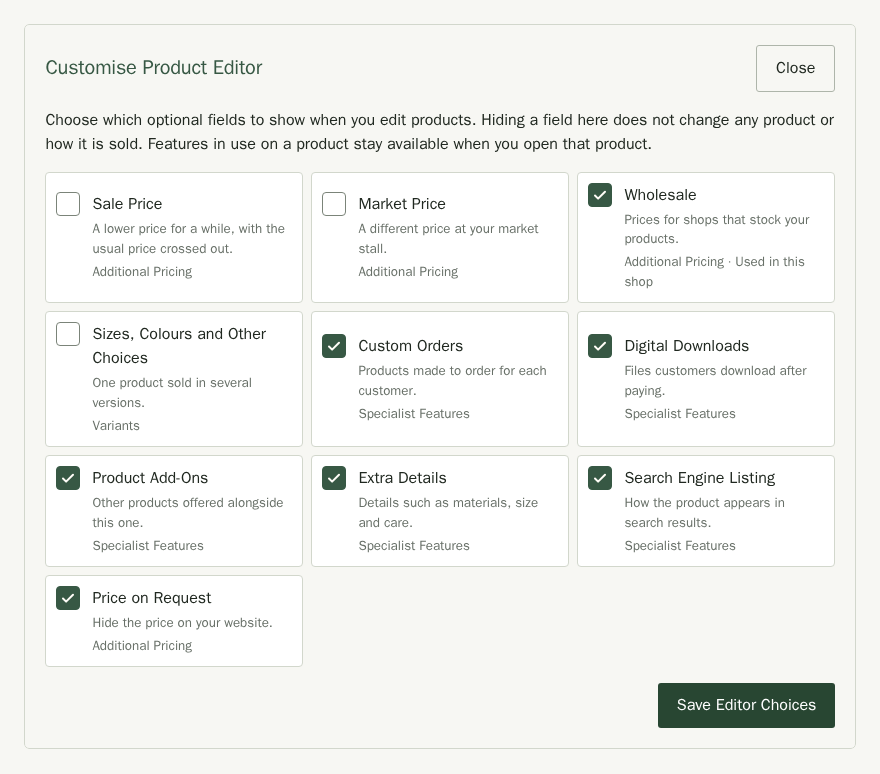
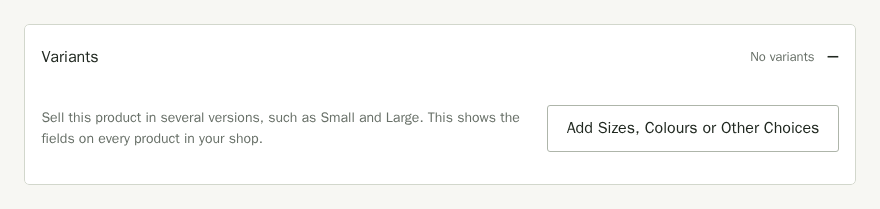
You can also turn on sizes and colours, a sale price or a market price from the product you are editing. When one is off, its section shows a button instead: Add Sizes, Colours or Other Choices in Variants, and Add a Sale Price or Add a Market Price in Additional Pricing. Choosing it shows the fields straight away, for every product in your shop, and keeps what you have typed on this product. Only owners and admins see these buttons.
Change a Price or Other Details
- On the Products page, choose the product's name to open it.
- Change what you need, such as Retail Price.
- For a unique piece you will not restock, open Stock & Availability and tick One of a Kind. Its stock and online ordering work as usual, but Stallee leaves it out of low-stock warnings.
- Choose Save Product. Stallee returns you to the list and says whether the product is live on your site or still a draft.

Stock & Availability, Organisation, Shipping, Additional Pricing, Variants and Specialist Features fold closed to keep the editor shorter. Each heading summarises its current details. Open a section to edit it; closing it does not discard what you typed.
If a product will not save, Stallee says what to fix. A message beside each field explains the problem, such as Add a product name., and a list above the save buttons repeats them. Choose a message in the list to go to its field; a folded section opens for you.

The status badge, Preview, More Actions, Cancel and Save Product stay within reach while you scroll, with Publish beside a draft's badge. Choose More Actions for Duplicate. Save product details with Save Product. Stock counts and low-stock thresholds have their own save buttons in Stock & Availability; product suggestions use Save Add-Ons in Specialist Features.
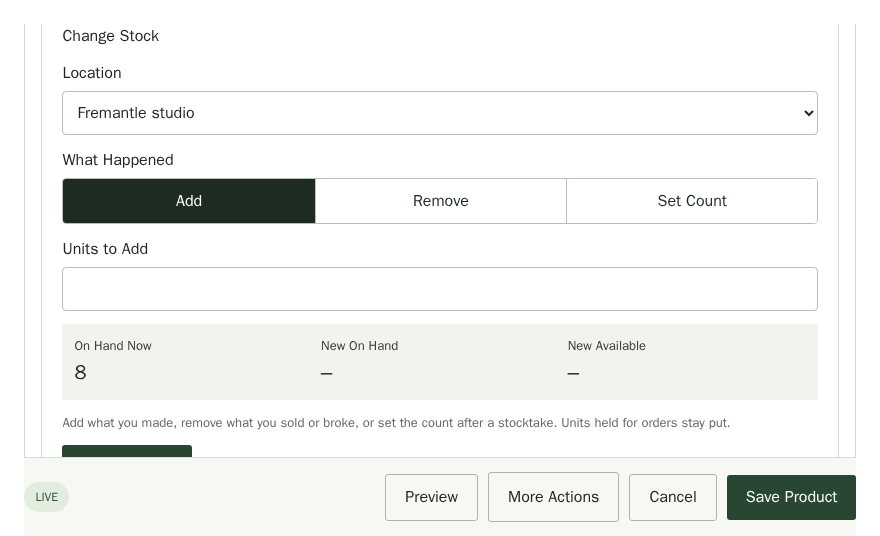
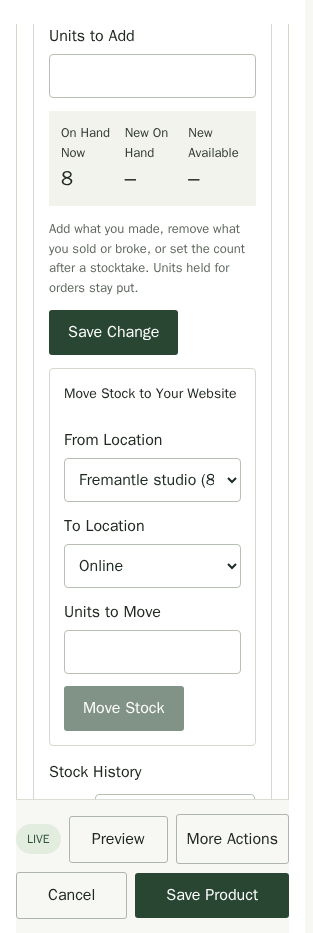
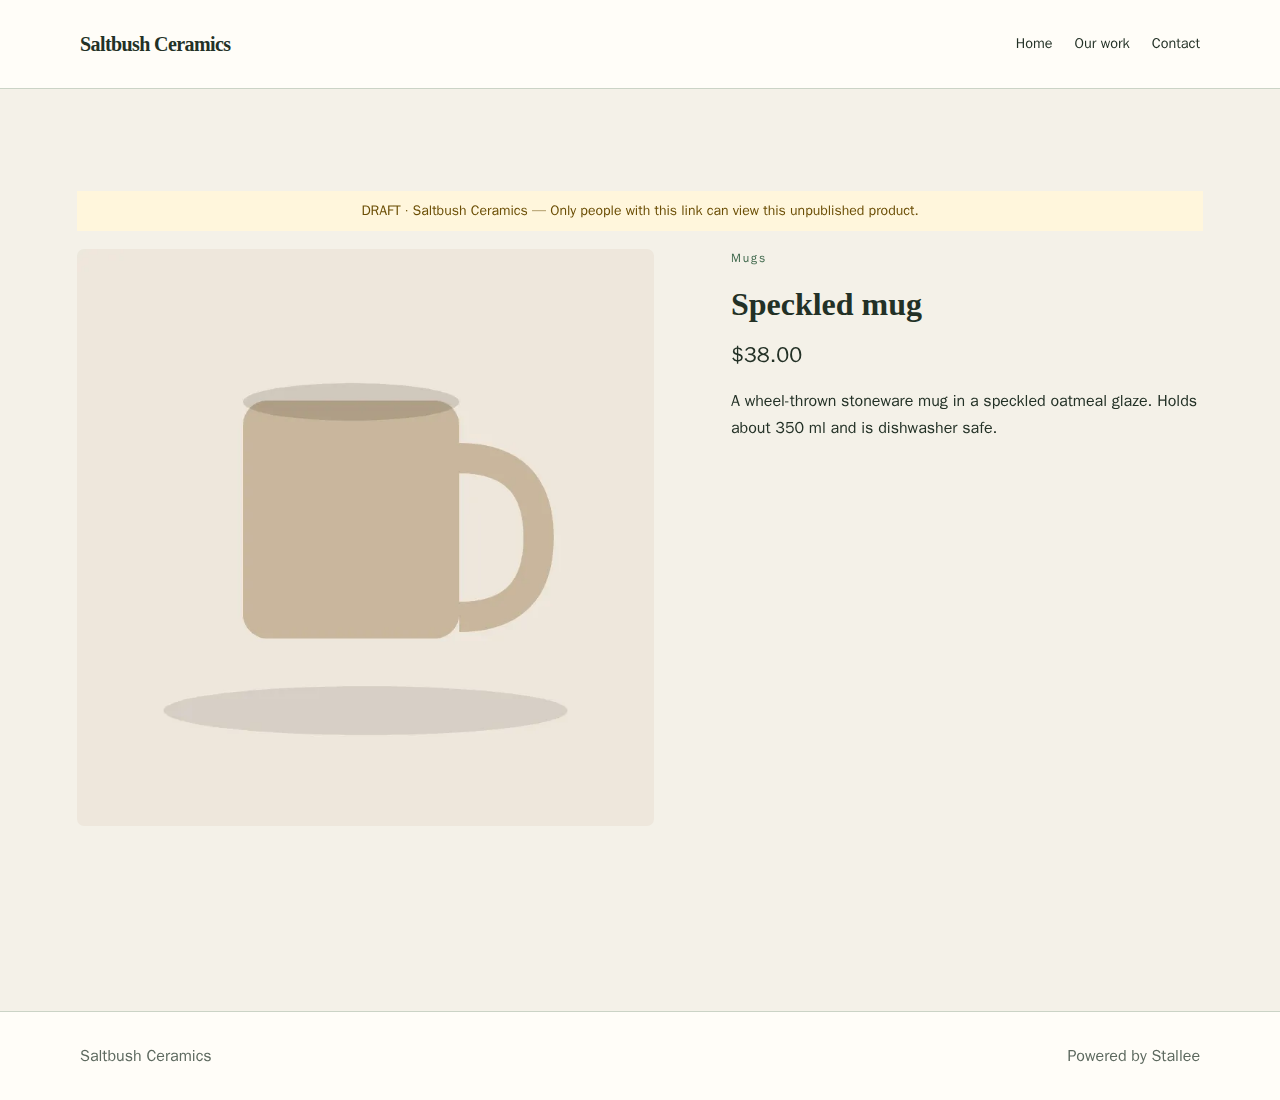
To see how a product will look on your website before you publish it, open it and choose Preview in the action bar. The preview opens in a new tab and shows the saved product with your shop's colours, logo and navigation. It keeps your other unpublished pages, page images and Advanced CSS private. Its link works for 30 days on your shop's website address, so you can share it. Only the shop owner and admins see this button.
Offer a Wholesale Price
- Open the product, expand Additional Pricing and tick Offer Wholesale Pricing.
- Type the Wholesale Price you charge trade buyers.
- Under Wholesale Description, choose what a wholesale invoice says about the product. It can use the product description, one of your extra details, or your own words in Different Wholesale Description. Only wholesale buyers see this text. Customers on your website never do.
- Choose Save Product.
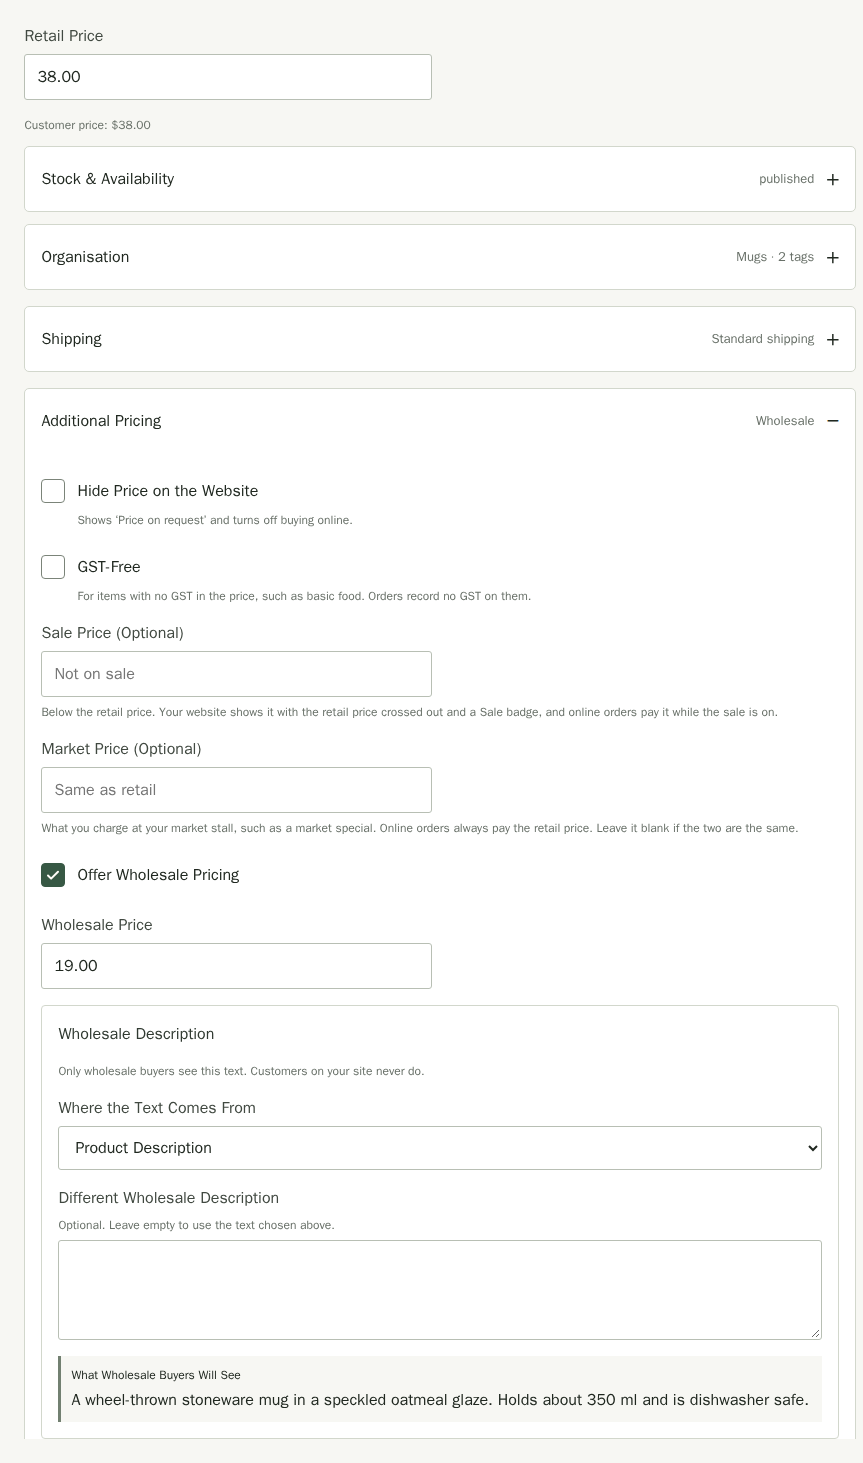
Untick Offer Wholesale Pricing to remove the wholesale details from the product when you save.
Add Options and Variants
Sell one product in several sizes, colours or styles, such as a mug in Small and Large. You add the product once and give each choice its own product code, price, stock and photos. Customers pick their choice on the product's page.
- Open the product and expand Variants. If you see Add Sizes, Colours or Other Choices, choose it first. In Options and Variants, choose Add Option.
- Type the Option Name, such as Size, and its Option Values separated by commas, such as Small, Large. You can add up to three options, such as Size and Colour.
- Choose Add All Combinations to make a variant for every choice, or Add Variant to add them one at a time. Each new variant starts with the product's prices.
- For each variant, check the Product Code (leave it blank and Stallee makes one), the Retail Price, and the Market Price if you charge a different price at your stall. If you offer wholesale pricing, each variant also has its own Wholesale Price.
- Choose Save Product.
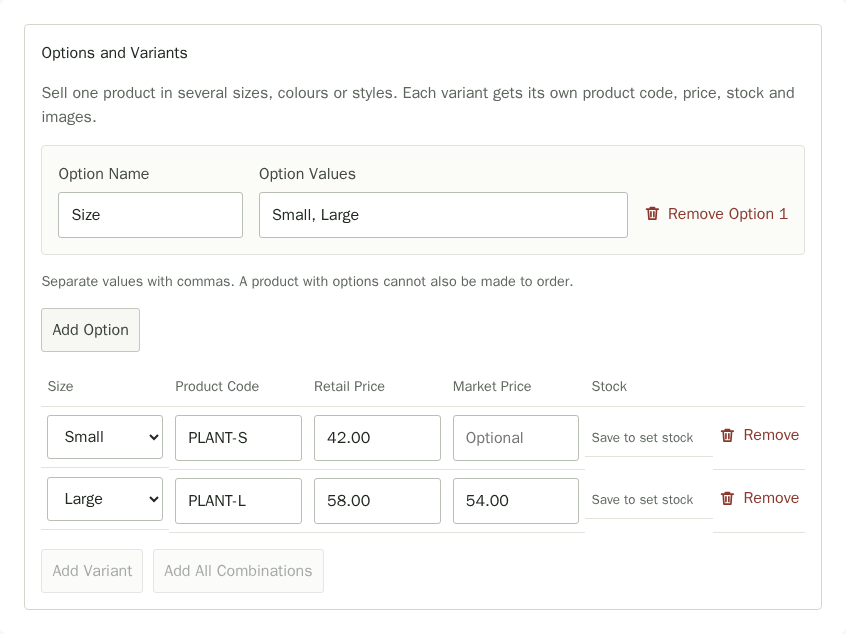
After you save, choose Stock and Images on a variant to set how many you have and to add its own photos. A variant's stock is counted separately, and the product list adds them up and shows how many variants a product has. Remove a variant with Remove: its stock and photos go with it, so only remove a choice you no longer sell. If you change a product's name, description, category, tags, collections or status, every variant follows it.
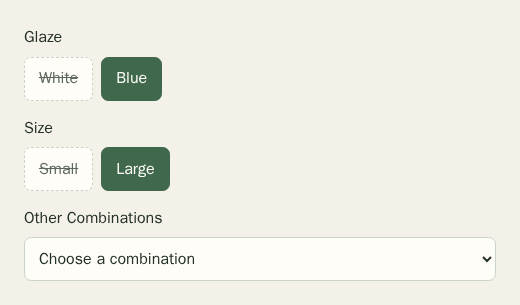
If you sell only some combinations, customers may see Other Combinations on the product page. They can use it to switch directly between choices such as White / Small and Blue / Large.
If you use the Google product feed, each variant needs its own GTIN or part number, and each option needs matching to what it means for Google. Both are in Google Merchant Center Details under Specialist Features once the product is saved. See Google Product Feed.
Show ‘Price on Request’ Instead of a Price
If you quote each job, such as a 3D print made to someone's measurements, you can keep the price off your website.
- Open Additional Pricing and tick Hide Price on the Website. The customer price under the retail price changes to Price on request.
- Choose Save Product.
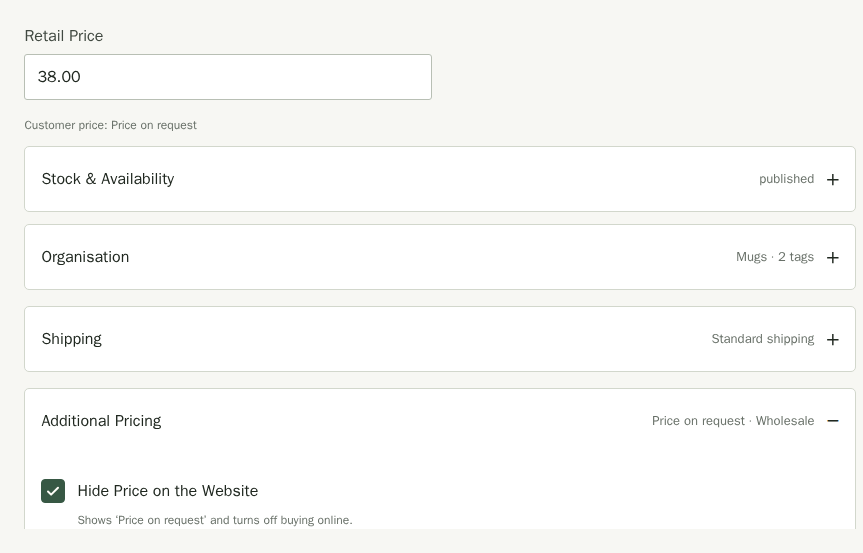
The product's card and its page say Price on request where the price would be. Customers cannot add it to the cart or buy it online. Its page points them to your Contact page instead, so they can ask you for a quote. You still see the retail price in your workspace, and it is kept if you show the price again later. Untick the box and save to put the price and the Add to cart button back.
While every published product is price on request, or no product is published yet, your site shows no cart at all: the Cart link leaves the menu and the cart page is not there. Both return on their own as soon as a product with a price is published.
Sell a GST-Free Product
If your business is registered for GST, turn on Registered for GST in Online Sales. The GST-free options then appear here. Some products carry no GST, such as basic food. Open the product's Additional Pricing section, tick GST-Freeand choose Save Product. Orders record no GST on that item, while other items can still carry GST. To change several products, select them in the list and choose Mark GST-free or Mark GST included. If you turn registration off later, Stallee keeps those product flags but hides them and does not apply GST. These options are named for your shop's tax, which follows the Shop Country you chose in Online Sales. A New Zealand shop sees the same GST-Free option, for items you charge no GST on. A shop in the United Kingdom or the EU sees a VAT Treatment choice in its place: Standard rate, Zero-rated or Exempt from VAT. Zero-rated and exempt items carry no VAT in the price, but VAT returns treat them differently, so the Sales page reports them apart. The bulk actions become Mark standard-rated, Mark zero-rated and Mark VAT-exempt. A shop in the United States sees an Exempt from sales tax checkbox for items that carry no sales tax where you sell them, such as some groceries or clothing, and the bulk actions Mark exempt and Mark taxable.

Duplicate a Product
To start a new product from one you already have, open it and choose More Actions, then Duplicate. Stallee makes a draft called Copy of the original with the same description, prices, category, tags, collections, extra details and photos, a new product code and no stock. Rename it, change what differs and publish it when it is ready. You can also tick several products in the list and pick Duplicate from the bulk actions.
Charge a Different Price at Markets
Some shops sell a piece for a little less at their market stall than online, as a market special. You can keep both prices on the product.
- Open Additional Pricing and enter the stall price in Market Price. If the field is not there, choose Add a Market Price first. Leave it blank if you charge the same everywhere.
- To tell customers about it, tick Show the Market Special on the Website.
- Choose Save Product.
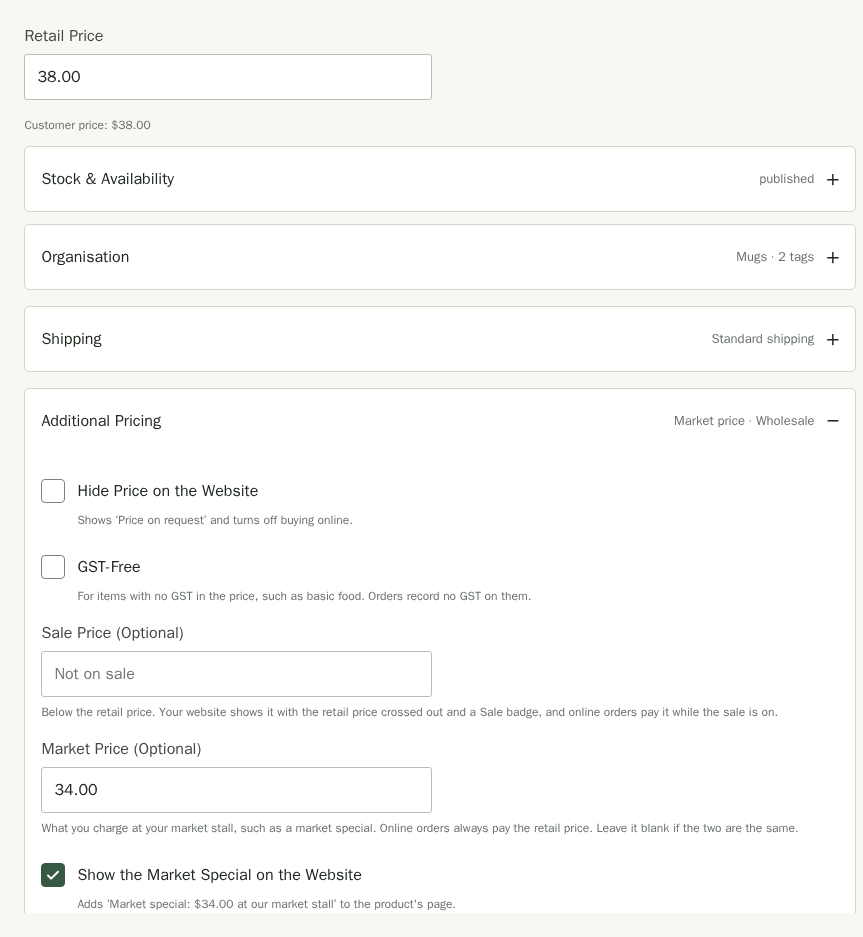
Online orders pay the retail price, or the sale price while a sale is on (see Put a Product on Sale below). The product list shows the market price under the retail price. If you ticked the box, the product's page says Market special with the market price under the online price. If you use Square at your stall, see Payments for how the market price reaches Square.
Put a Product on Sale
Mara marks her Speckled mug down for a week in January. A sale shows customers a lower price with the usual price crossed out, and it ends on its own.
- Open Additional Pricing and type the price customers will pay in Sale Price. If the field is not there, choose Add a Sale Price first. It must be lower than the retail price. The field is not shown for made-to-order products.
- To schedule the sale, set Sale Starts (Optional) and Sale Ends (Optional). Both are optional and use your shop's time zone. Leave both blank to start the sale now and run it until you clear the sale price.
- Choose Save Product.
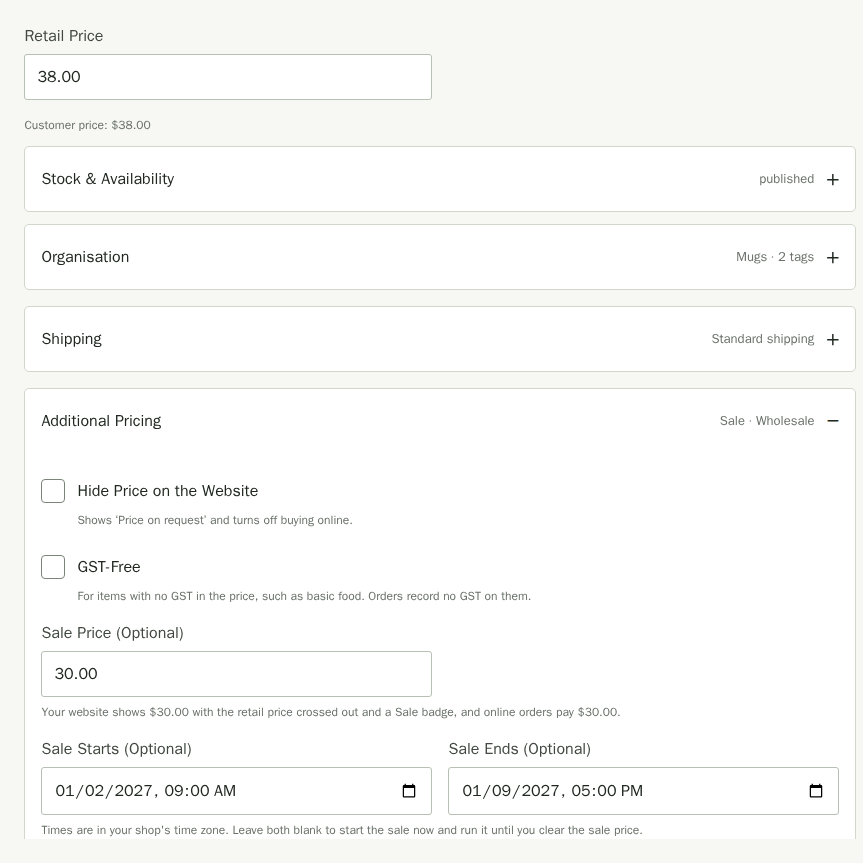
The product list shows a note under the price while the product is on sale or has a sale coming up. Clear Sale Price and save to end a sale early.
Put Several Products on Sale
- Tick the products you want in the product list.
- Choose Put on sale (% off) from the action box, type a percentage from 1 to 99, and choose Apply.
Each selected product gets a sale price that many percent below its retail price, rounded to the nearest cent. To end sales in bulk, select the products and choose End sale.
What Customers See
On your website, a product on sale shows its sale price with the retail price crossed out and a Sale badge, on product grids, on the product page and in the cart. Checkout charges the sale price. When the sale ends, the retail price comes back on its own. You do not need to publish your site. If the product is matched to a Square variation, Stallee sends the sale price when the sale starts and sends the retail price again when it ends. Square's market-location price stays as a location override.
To take a percentage or dollar amount off a whole order, or offer a code, see Discounts.
Change a Product's Web Address
Each product has its own page on your site. When you publish a new product, Stallee makes the page address from the product name, so a Glazed Butter Dish is at /products/glazed-butter-dish. A readable address is easier to share, and tells search engines what the page is about. To choose the words yourself:
- Open the product and choose Edit Address under the product name.
- Type the new ending in Page Address, using small letters, numbers and dashes, such as
butter-dish. - Choose Save Product.

The address the product had before keeps working and sends visitors to the new one, so links you have already shared and search results still reach the product. If another product already uses an address, Stallee tells you beside the field so you can choose a different one.
Products you added before readable addresses arrived keep an address that ends in a code. When any are left, the Products page offers Give Every Product a Readable Address, which makes one for each published product from its name. The old addresses keep working.
Choose How a Product Appears in Search Results
Search engines such as Google show a title and a short description for each page. For a product, Stallee writes them for you: the title is the product name followed by your shop name, and the description is the start of your product description. To word them yourself:
- Open Specialist Features, then expand Search Engine Listing.
- Type an SEO Title of up to 70 characters and an SEO Description of up to 160. The counts under each box show how many you have used.
- Check Search Result Preview, which shows how the listing would read.
- Choose Save Product.
Leave a box empty to go back to the automatic text. Your own title also appears in the browser tab and when someone shares the product's link. Search engines may still choose their own wording.
Stallee also adds product details for search engines to every published product page automatically: the name, description, photos, product code, price, and whether it is in stock. Nothing to set up. A product with Hide Price on the Website ticked shares no price.
Set a Weight and How a Product Ships
Open Shipping for two fields that tell the cart how to post a product. Fill them in if you charge delivery by zone; see Online sales.
- Weight (grams) is used by delivery rates priced by weight. Leave it empty if you do not use them; the product then adds nothing to the order weight.
- Shipping is Standard (Priced by Shipping Zones) for most products. Ships Free leaves the product out of the postage calculation, so a customer buying only such products pays no delivery. Pickup Only stops the product from being posted at all: a customer with it in their cart must choose local pickup, so turn pickup on in Online sales first.
Choose Add-Ons for a Product
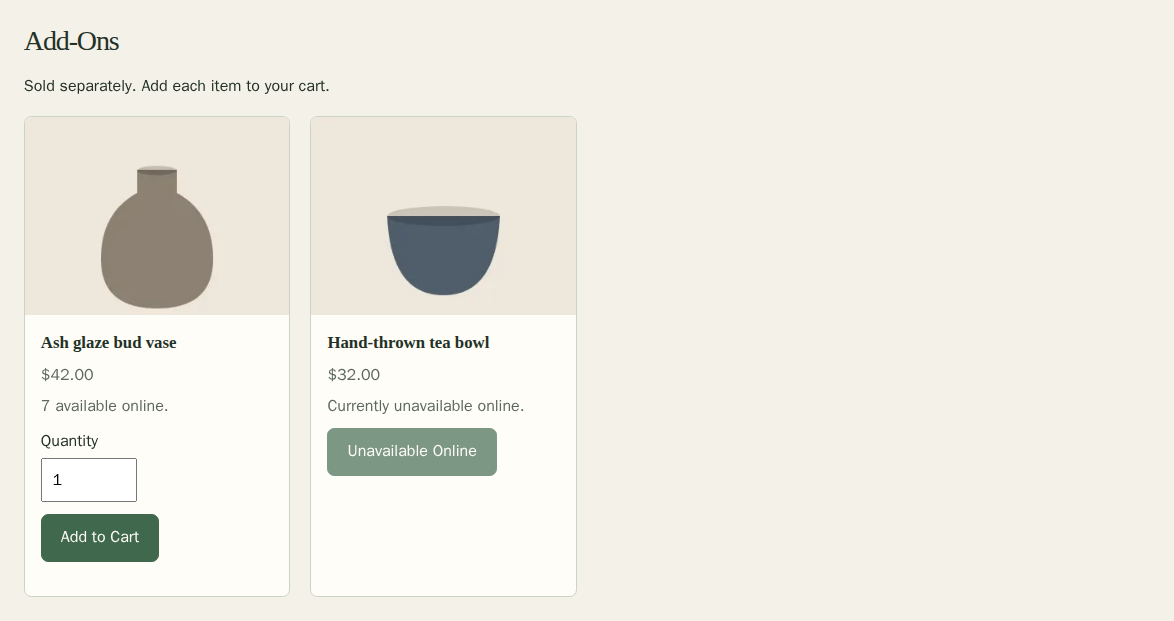
Offer a few useful companions, such as a bud vase or tea bowl alongside a mug. Your choices appear under Add-Ons on the product page. They are separate from the automatic More Like This and From the Same Collection suggestions.
- Open a saved product. For a new product, choose Save Product first.
- Open Specialist Features.
- Under Product Add-Ons, enter a name in Find Products.
- Choose Search Products, then Add beside a product. Choose up to four.
- Use Up and Down to set their order, or Remove to leave one out.
- Choose Save Add-Ons. This saves the section separately from Save Product.
You can choose draft products while preparing your range. Buyers see eligible published products only. A selection that becomes unavailable stays listed in the editor with a warning so you can remove it yourself.
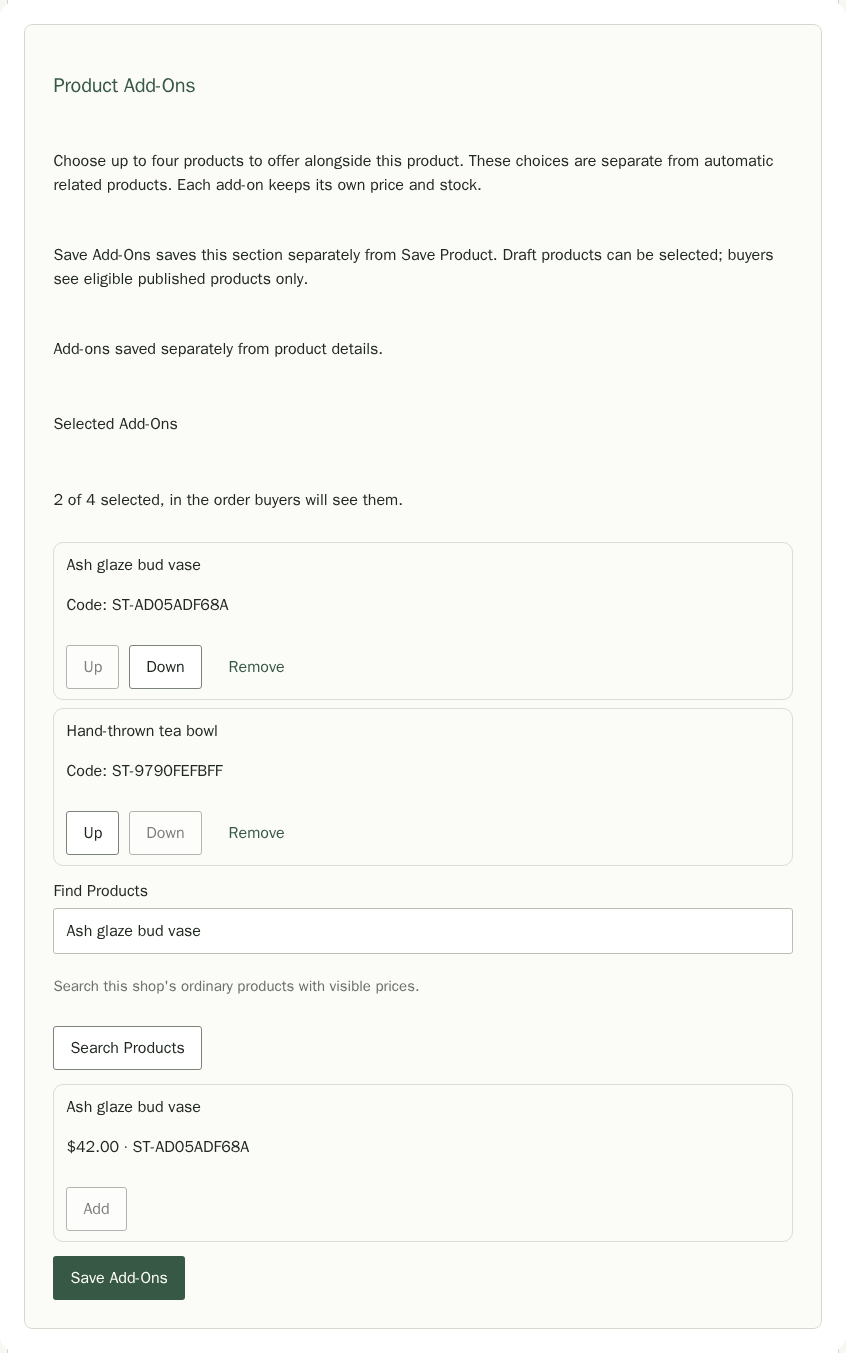
Buyers choose any required size or other option and add each product to their cart separately. An add-on keeps its current price, stock and delivery rules. Choosing one does not create a bundle or discount, and adding it to the cart does not reserve stock. Checkout checks the current price and availability again.
Organise products and choose what shows on your site
Category, Subcategory, Tags and Collections group products so you and your customers can find them. A product can sit in several collections, such as Gifts and Autumn market.
To give a collection its own page, cover image and optional automatic rules, open Collections and choose the collection under Products to show. Automatic matches do not change the collections saved on your products.
Collections also help customers keep browsing. Under a product's description, its page shows up to three other published products, headed From the Same Collection. If no other product shares a collection, it shows products in the same category, headed More Like This. The product's first collection appears as a link by its name that takes customers to your Products page filtered by that collection.
On the published product page, Reviews and the related products line up with the product content above. Their smaller headings keep your product name as the main heading. Customers can choose Write a Review or open a related product to keep browsing. The private product preview leaves out reviews and related products.
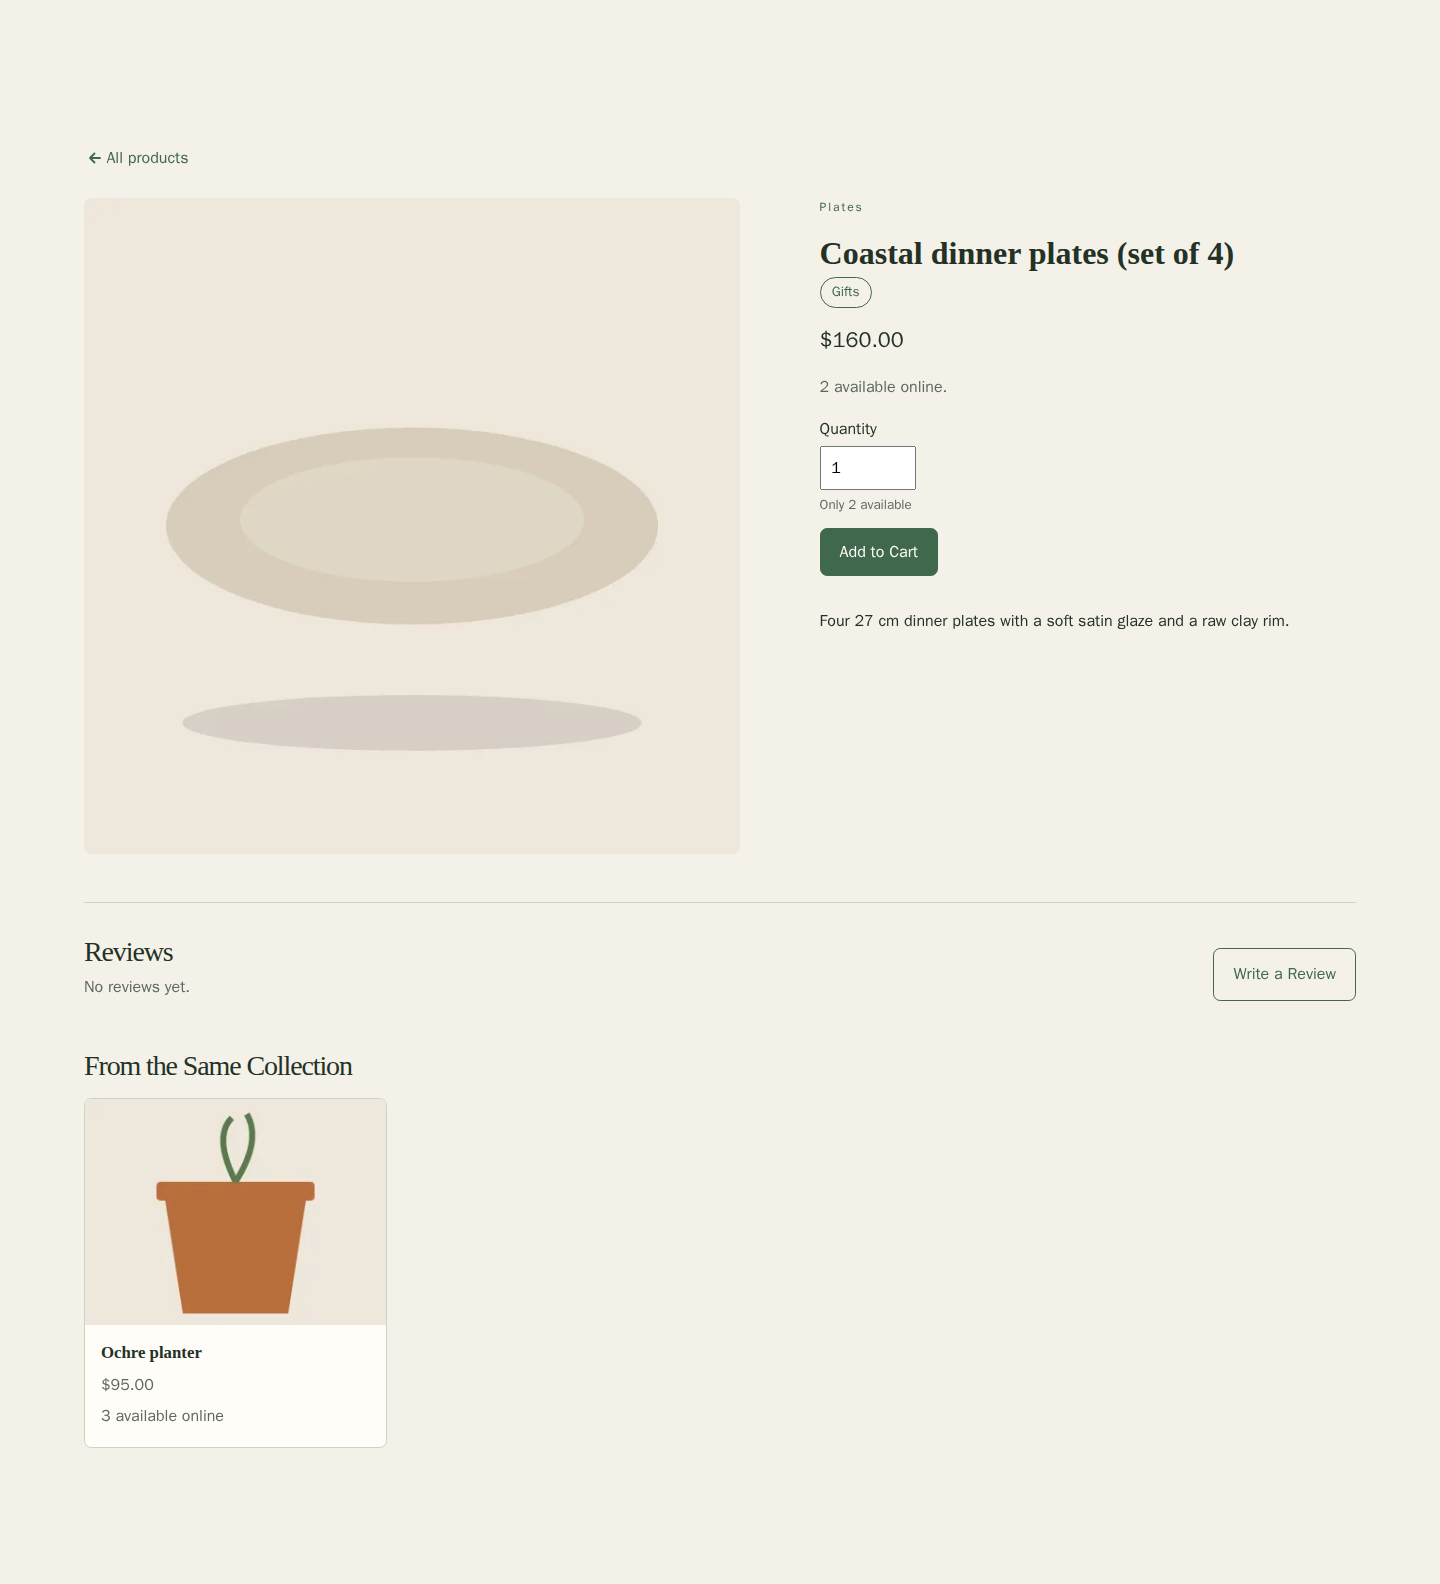
When more than one of a product is in stock, customers can choose a Quantity up to the number available before they add it to their cart. They see Only 5 available (or the number left) once five or fewer remain.
Open Stock & Availability to change Status. It decides where a product appears:
- Draft keeps it private while you work on it.
- Published shows it on your website.
- Archived keeps the product on file but off your website, for lines you have stopped making.
- Market Only is for products you sell in person. They are not sold on your website.
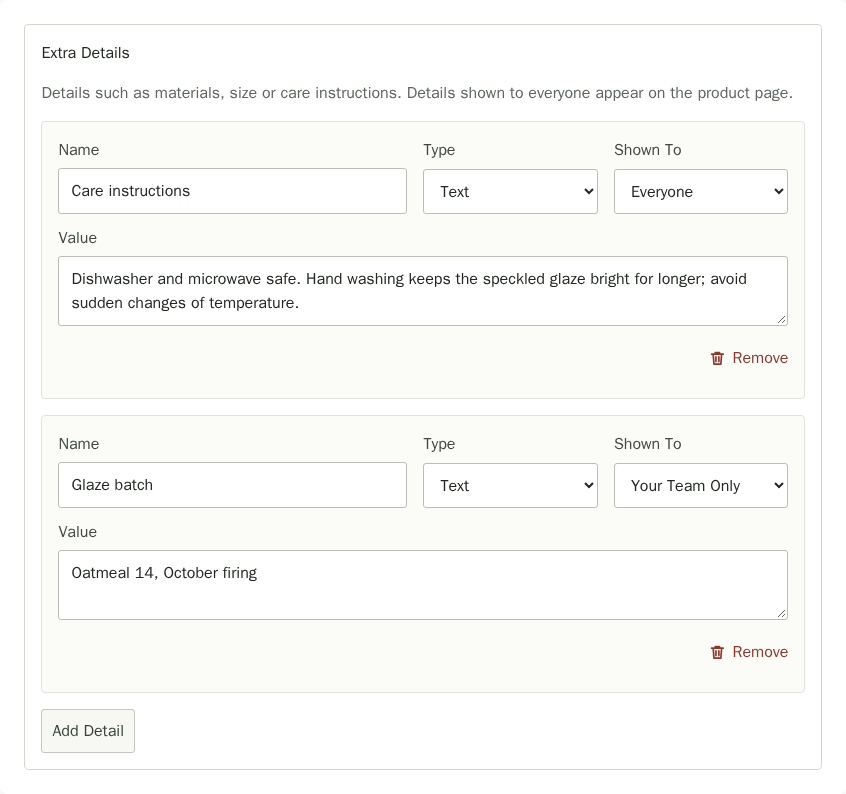
Under Specialist Features, Extra Details lets you add details such as materials, size or care instructions. Choose Add Detail, give it a Name such as Materials, pick its Type (text, number, yes or no, date or web address) and type its Value. Under Shown To, choose Everyone to show it on the product page, Your Team Only to keep it private, or Wholesale Buyers.
Choose Remove beside a detail you no longer want.
Schedule a Launch
Mara finishes her new Speckled mug on Sunday night, but wants it on her website on Saturday morning, when her market newsletter goes out. A launch publishes a product for you at the time you choose.
- Open the product and set Status to Draft or Market Only.
- Choose a date and time in Launch At (Optional). The time is in your shop's time zone.
- Choose Save Product.
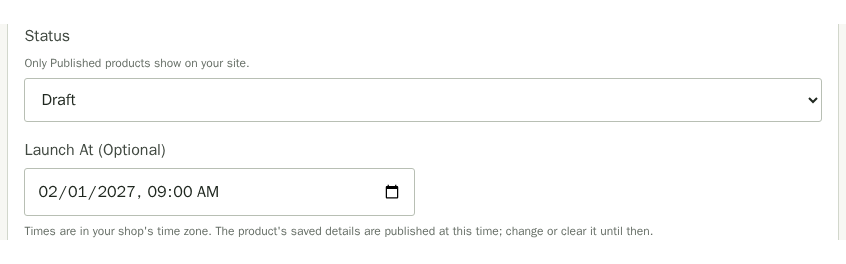
The product list shows Launches and the date and time beside the status of each product with a launch coming up. At that time Stallee publishes the product as you last saved it, so changes you save before then go live with it. A launch can start a few minutes after the time you chose.
To change the time, open the product, pick another time and save. To cancel the launch, clear Launch At (Optional) and save. The product stays private either way. The field only shows for a Draft or Market Only product. If you choose Published or Archived for the product, or publish it from the list, the launch is cancelled.
Sell a Product Only to People With a Password
Mara wants her newsletter readers to buy the new Ash glaze bud vase a week before everyone else. A password keeps a published product private: only people who open its link and enter the password can see or buy it.
- Open the product and open Stock & Availability.
- Under Password Protection, type a password of at least six characters in Password.
- Choose Set Password. Keep a copy of the password: Stallee cannot show it to you again.
- Publish the product if it is still a draft, then send your customers the product's link and the password.
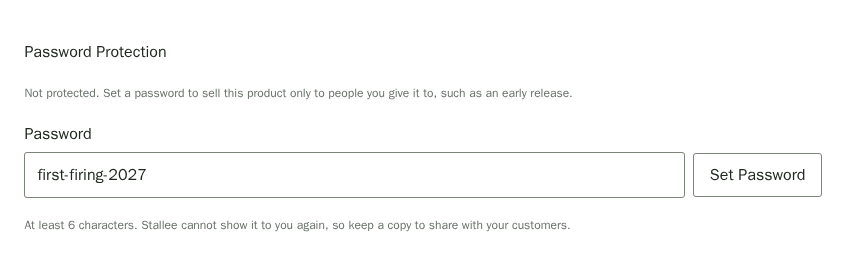
A protected product does not appear on your shop pages, in search, in collections or beside other products. Its pictures cannot be opened without the password either. A customer who opens the link sees only a request for the password.
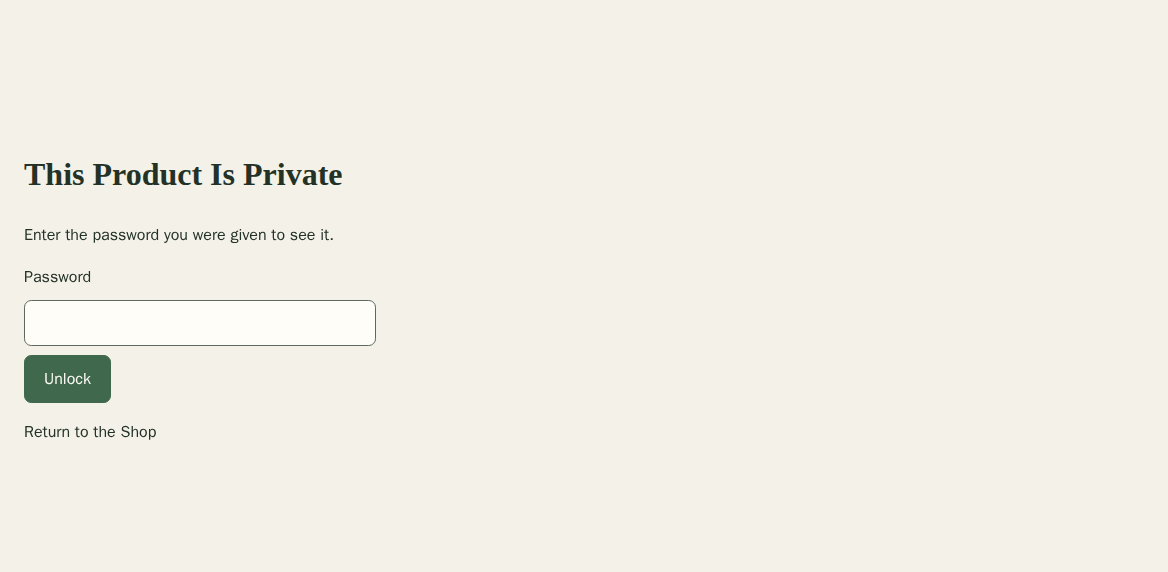
Once a customer enters the password, the product stays open in that browser for 24 hours, and they can add it to their cart and pay as usual. After that they enter the password again.
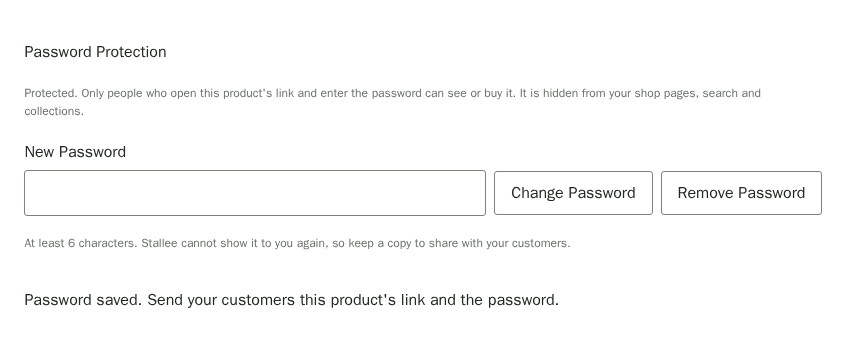
To change the password, type a new one and choose Change Password. Everyone who had already unlocked the product must enter the new password. To sell the product to everyone, choose Remove Password, then Yes, Remove Password. It then shows on your shop straight away.
You can set a password on a draft and schedule its launch: the product goes live still protected, and stays that way until you remove the password. A copy of a protected product, and a product restored from a backup, has no password; a restored product comes back as a draft so you can set one before publishing. Only the shop's owner or an admin can set, change or remove a password.
Your plan's product limit applies at launch time. If you have reached it, the product stays private and its launch is cleared, so unpublish another product or change plan, then set the launch again. Products with variants launch with all their variants.
Take Custom Orders
Some pieces are made only when someone orders them, such as a dinner set in the glaze a customer picks. Make the product a custom order and customers pay a deposit when they order. You then set the final price and charge the balance when the piece is ready.
- Open the product, or choose Add Product, and set its Retail Price. This is the price the deposit is worked out from, such as $480.00 for the Custom dinner set.
- Open Specialist Features and tick This product is made to order.
- Set the Deposit (% of the Price). It starts at 50, so a $480.00 set takes a $240.00 deposit.
- To ask customers about their order, choose Add Question and type it in Question 1, for example Number of place settings. Tick Long Answer (Several Lines) for a longer answer. You can add up to eight questions, and customers can leave any of them blank. Choose Remove Question to delete one.
- Under Images the Buyer Can Attach, choose None or up to 5 images, so customers can show you what they have in mind.
- Open Stock & Availability, set Status to Published and choose Save Product.
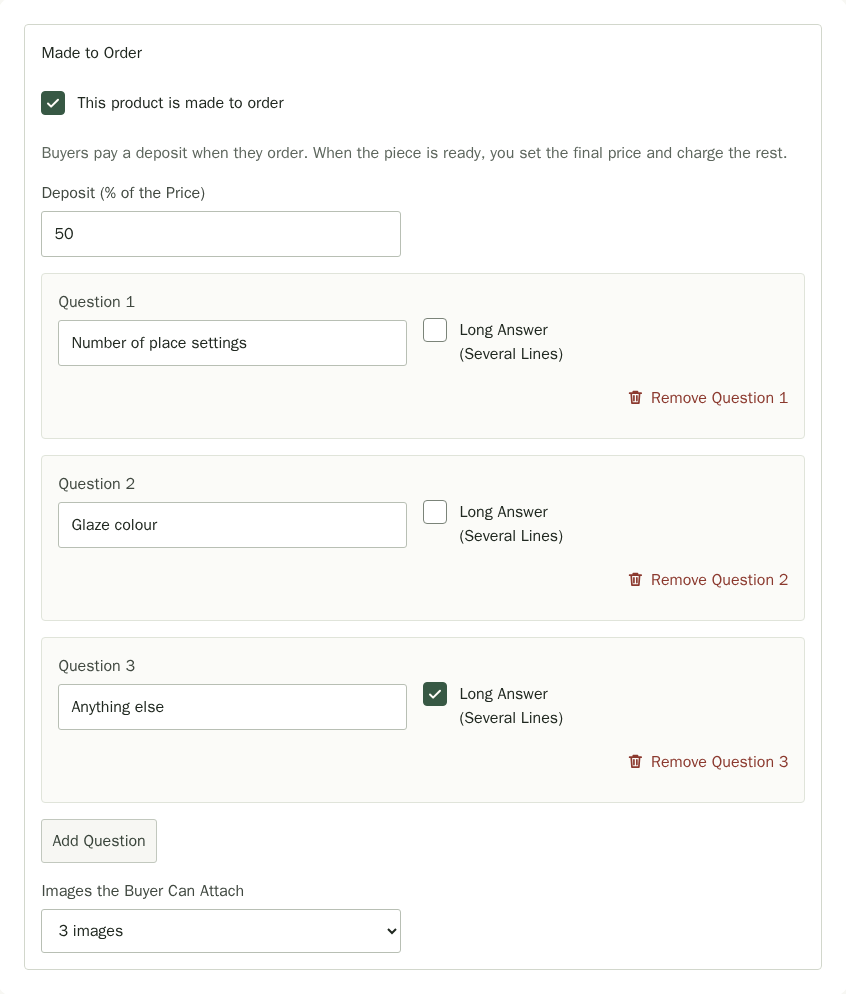
Untick This product is made to order to turn the product back into an ordinary one.
What Customers See
On your website the product page becomes an order form. It shows Made to Order, the Deposit today and the Balance when it’s ready, which starts from the remaining amount because you set the final price. Under them are your questions, a choice of delivery or pickup, and Add Images for reference images: each image they choose appears as a small picture with a Remove button, beside a count of how many more they can add. Due today adds postage to the deposit. The customer chooses Pay Deposit and pays on Stripe’s secure page. Their card is saved so you can charge the balance later.
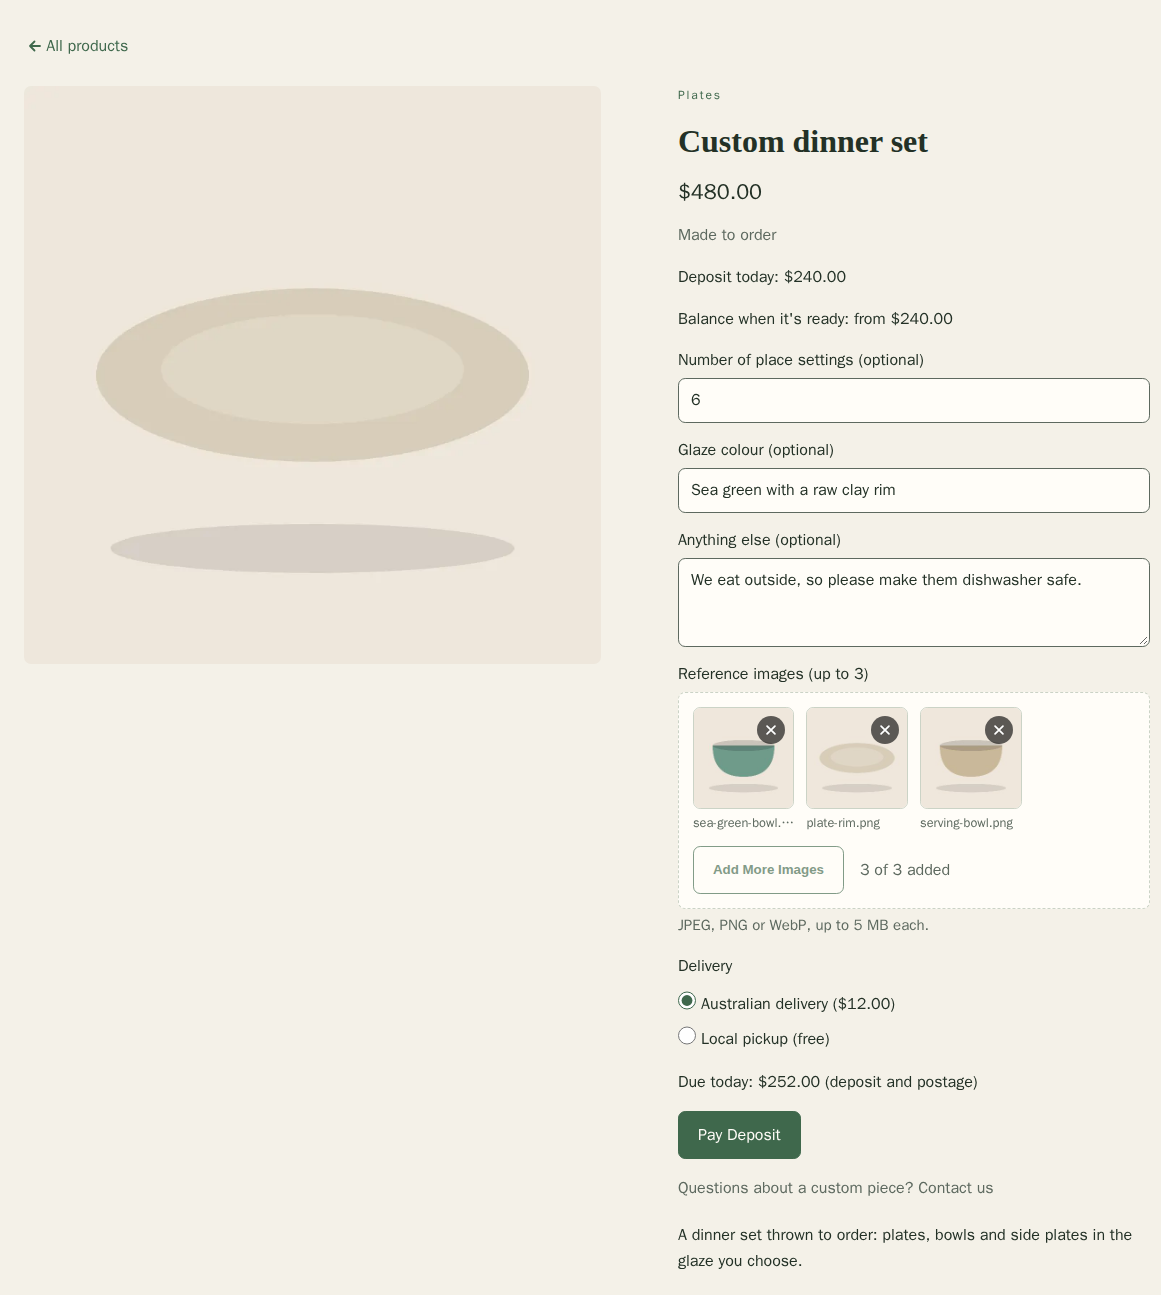
A custom order is never added to the cart: each one is its own checkout. The page also links to your contact form for customers with questions before they order.
If you have been taking custom pieces as enquiries, a custom order product can replace them, because customers pay and give their details in one step. The contact form stays useful for questions. Open its page in Page Settings to set it up.
The order then arrives on your Orders page, with the customer’s answers and images. When the piece is finished, you set the final price and charge the balance from the order. The Orders guide has the steps.
Sell Digital Downloads
A digital download is a product the customer gets as files, such as a printable pattern or a care guide. It has no stock and no postage, and a cart of only digital downloads skips the delivery step.
- Open the product, or choose Add Product, and set its Retail Price.
- Open Specialist Features and tick This product is a digital download.
- Set Downloads Allowed per File (it starts at 5) and Links Stay Valid for (days) (it starts at 30).
- Choose Save Product. Then choose Add Files and pick up to five files of up to 100 MB each. You can add PDF, ZIP, PNG, JPG, SVG, EPUB and MP3 files. Choose Remove to take one off.
- Open Stock & Availability, set Status to Published and choose Save Product. A product with no files cannot be bought.
On your website the product page says Digital download · sent by email after purchase instead of showing stock. A customer who buys a digital download together with a physical item still chooses delivery or pickup for the physical item.
Change Many Products at Once
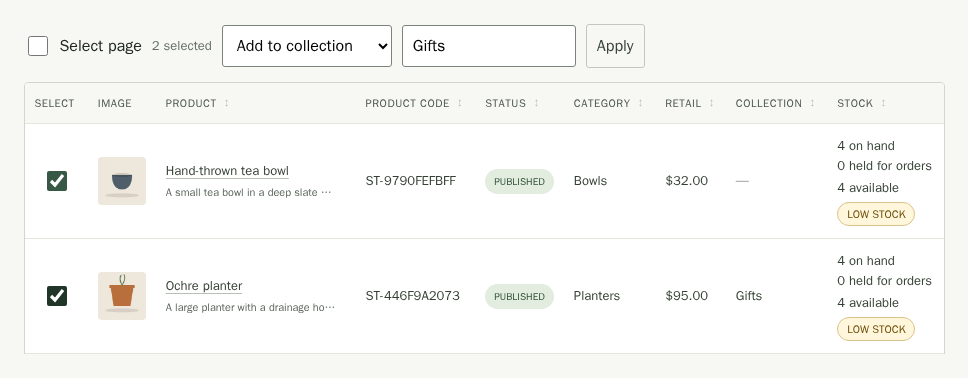
- Tick the products you want, or tick Select page to choose everything on the page.
- Pick an action from the box beside selected: Publish, Unpublish, Add tag, Add to collection, Duplicate, Put on sale (% off), End sale or Delete. When your shop is registered for GST, you can also choose Mark GST-freeor Mark GST included. For a tag or collection, type its name.
- Choose Apply, then confirm. The change applies only to the products you ticked.
Recount Several Products
Choose Recount Stock above the Products list to download stock by location or product search. Enter your physical counts in the CSV, upload it and review the changes before applying them. You do not need to tick products in the list first. Follow the Stock guide for the download, preview and confirmation steps.
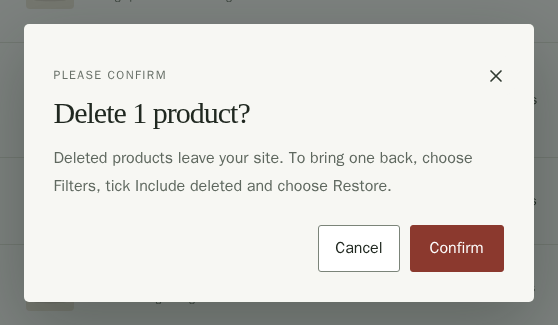
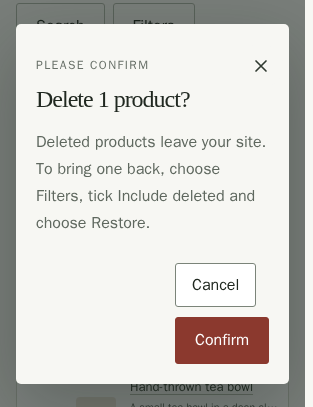
Choose Cancel or press Escape to keep your products unchanged. While a confirmed change is saving, wait for it to finish before trying again.
Delete and Restore a Product
Delete moves products to deleted items rather than wiping them. To find them, choose Filters, tick Include deleted and choose Apply Filters. Choose Restore beside a product to bring it back to the status it had.
Once a product is saved, track how many you have in Stock & Availability at the bottom of its page. See Stock levels and locations.
Reviews
Buyers can rate a published product, and the reviews you approve show on its page with an average rating. See Reviews to ask customers for reviews and to publish, hide or reply to them.